This is the multi-page printable view of this section. Click here to print.
Getting Started
- 1: Installation
- 2: Offline Install
- 3: Slim Installation
- 4: Configuration
- 5: Preparation
- 6: Playbooks
- 7: Provisioning
- 8: Security
- 9: FAQ
1 - Installation
Install Pigsty with 4 steps: Prepare, Download, Configure and Install. Also check offline if you don’t have internet access.
Short Version
Prepare a fresh x86_64/aarch64 node that runs any compatible Linux OS Distros, then Download Pigsty with:
curl -fsSL https://repo.pigsty.io/get | bash; cd ~/pigsty;
You can run the optional bootstrap and configure to install ansible and generate pigsty.yml config file.
Next, run the install.yml playbook with an admin user (nopass ssh & sudo):
./bootstrap; ./configure; ./install.yml;
- bootstrap: OPTIONAL, make sure
ansibleis installed, and use offline package/tmp/pkg.tgzif applicable - configure: OPTIONAL, recommend & generate
pigsty.ymlconfig according to your env. - install.yml: REQUIRED, install Pigsty modules according to your config file.
It may take several minutes to complete the installation according to your network speed and hardware spec.
After that, you will get a pigsty singleton node ready, with Web service on port 80/443 and Postgres on port 5432.
BTW: If you feel Pigsty is too complicated, you can consider the Slim Installation, which only installs the necessary components for HA PostgreSQL clusters.
Example: Singleton Installation on RockyLinux 9:

Use the pig CLI
Pigsty has a built-in CLI tool: pig, which is a package manager for PostgreSQL & extensions, and a cli for Pigsty.
curl https://repo.pigsty.io/pig | bash
It will install the pig cli tool, you can install pigsty with pig sty sub command:
pig sty init     # extract the embed src to ~/pigsty
pig sty boot     # run bootstrap to install ansible & deps
pig sty conf     # run configure to generate pigsty.yml conf
pig sty install  # run install.yml to complete the installation
Prepare
Check Preparation for a complete guide of resource preparation.
Pigsty support the Linux kernel and x86_64/aarch64 arch. It can run on any nodes: physical machine, bare metal, virtual machines, or VM-like containers, but a static IPv4 address is required.
The minimum spec is 1C1G. It is recommended to use bare metals or VMs with at least 2C4G. There’s no upper limit, and node param will be auto-tuned.
We recommend using fresh RockyLinux 8.10 / 9.4 or Ubuntu 22.04 as underlying operating systems. For a complete list of supported operating systems, please refer to Compatibility.
Public key ssh access to localhost and NOPASSWD sudo privilege is required to perform the installation, Try not using the root user.
If you wish to manage more nodes, these nodes needs to be ssh / sudo accessible via your current admin node & admin user.
DO NOT use the root user
While it is possible to install Pigsty as theroot user, It would be much safer using a dedicate admin user (dba, admin, …). due to security consideration
which has to be different from root and dbsu (postgres). Pigsty will create an optional admin user dba according to the config by default.
Pigsty relies on Ansible to execute playbooks. you have to install ansible and jmespath packages fist before install procedure.
This can be done with the following command, or through the bootstrap procedure, especially when you don’t have internet access.
sudo apt install -y ansible python3-jmespathsudo dnf install -y ansible python3.12-jmespath python3-cryptographysudo yum install -y ansible # EL7 does not need to install jmespath explicitlybrew install ansibleDownload
You can get & extract pigsty source via the following command:
curl -fsSL https://repo.pigsty.io/get | bash; cd ~/pigsty
Install with get script
$ curl -fsSL https://repo.pigsty.io/get | bash
[v3.3.0] ===========================================
$ curl -fsSL https://repo.pigsty.io/get | bash
[Site] https://pigsty.io
[Demo] https://demo.pigsty.io
[Repo] https://github.com/pgsty/pigsty
[Docs] https://pigsty.io/docs/setup/install
[Download] ===========================================
[ OK ] version = v3.3.0 (from default)
curl -fSL https://repo.pigsty.io/src/pigsty-v3.3.0.tgz -o /tmp/pigsty-v3.3.0.tgz
######################################################################## 100.0%
[ OK ] md5sums = 01b4acbe8983c1324652ae68b4f3c56f  /tmp/pigsty-v3.3.0.tgz
[Install] ===========================================
[WARN] os user = root , it's recommended to install as a sudo-able admin
[ OK ] install = /root/pigsty, from /tmp/pigsty-v3.3.0.tgz
[TodoList] ===========================================
cd /root/pigsty
./bootstrap      # [OPTIONAL] install ansible & use offline package
./configure      # [OPTIONAL] preflight-check and config generation
./install.yml    # install pigsty modules according to your config.
[Complete] ===========================================
To install a specific version, pass the version string as the first parameter:
curl -fsSL https://repo.pigsty.io/get | bash -s v3.3.0; cd ~/pigsty
You can also use git to download the Pigsty source. Please make sure to check out a specific version before using.
git clone https://github.com/pgsty/pigsty; cd pigsty; git checkout v3.3.0
Checkout a specific version
Themain branch may in an unstable development status.
Always checkout a version when using git, check Release Notes for available versions.
Configure
configure will create a pigsty.yml config file according to your env.
This procedure is OPTIONAL if you know how to configure pigsty manually. There are many config tempalte for your reference.
./configure # interactive-wizard, ask for IP address
./configure [-i|--ip <ipaddr>]                     # give primary IP & config mode
            [-c|--conf <conf>]                     # specify config template (relative to conf/ dir without .yml suffix)
            [-v|--version <ver>]                   # specify PostgreSQL major version (13,14,15,16,17)
            [-r|--region <default|china|europe>]   # choose upstream repo region
            [-n|--non-interactive]                 # skip interactive wizard
            [-x|--proxy]                           # write proxy env to config
Configure Example Output
$ ./configure
configure pigsty v3.3.0 begin
[ OK ] region = china
[ OK ] kernel = Linux
[ OK ] machine = x86_64
[ OK ] package = rpm,yum
[ OK ] vendor  = centos (CentOS Linux)
[ OK ] version = 7 (7)
[ OK ] sudo = vagrant ok
[ OK ] ssh = vagrant@127.0.0.1 ok
[WARN] Multiple IP address candidates found:
    (1) 192.168.121.110	    inet 192.168.121.110/24 brd 192.168.121.255 scope global noprefixroute dynamic eth0
    (2) 10.10.10.10	    inet 10.10.10.10/24 brd 10.10.10.255 scope global noprefixroute eth1
[ OK ] primary_ip = 10.10.10.10 (from demo)
[ OK ] admin = vagrant@10.10.10.10 ok
[WARN] mode = el7, CentOS 7.9 EOL @ 2024-06-30, deprecated, consider using el8 or el9 instead
[ OK ] configure pigsty done
proceed with ./install.yml
-i|--ip: Replace IP address placeholder10.10.10.10with your primary ipv4 address of current node.-c|--conf: Generate config from config templates according to this parameter-v|--version: Specify PostgreSQL major version (13|14|15|16|17)-r|--region: Set upstream repo mirror according toregion(default|china|europe)-n|--non-interactive: skip interactive wizard and using default/arg values-x|--proxy: write current proxy env to the configproxy_env(http_proxy/HTTP_PROXY,HTTPS_PROXY,ALL_PROXY,NO_PROXY)
When -n|--non-interactive is specified, you have to specify a primary IP address with -i|--ip <ipaddr> in case of multiple IP address,
since there’s no default value for primary IP address in this case.
If your machine’s network interface have multiple IP addresses, you’ll need to explicitly specify a primary IP address for the current node using -i|--ip <ipaddr>, or provide it during interactive inquiry. The address should be a static IP address, and you should avoid using any public IP addresses.
You can check and modify the generated config file ~/pigsty/pigsty.yml before installation.
Change the default passwords!
PLEASE CHANGE THE DEFAULT PASSWORDs in the config file before installation, check secure password for details.Install
Run the install.yml playbook to perform a full installation on current node
./install.yml # install everything in one-pass
Installation Output Example
[vagrant@meta pigsty]$ ./install.yml

PLAY [IDENTITY] ********************************************************************************************************************************

TASK [node_id : get node fact] *****************************************************************************************************************
changed: [10.10.10.10]
...
...
PLAY RECAP **************************************************************************************************************************************************************************
10.10.10.10                : ok=288  changed=215  unreachable=0    failed=0    skipped=64   rescued=0    ignored=0
localhost                  : ok=3    changed=0    unreachable=0    failed=0    skipped=4    rescued=0    ignored=0
It’s a standard ansible playbook, you can have fine-grained control with ansible options:
-l: limit execution targets-t: limit execution tasks-e: passing extra args-i: use another config- …
DON'T EVER RUN THIS PLAYBOOK AGAIN!
It’s very DANGEROUS to re-run install.yml on existing deployment!
It may nuke your entire deployment!!! Only do this when you know what you are doing.
Otherwise, consider rm install.yml or chmod a-x install.yml to avoid accidental execution.
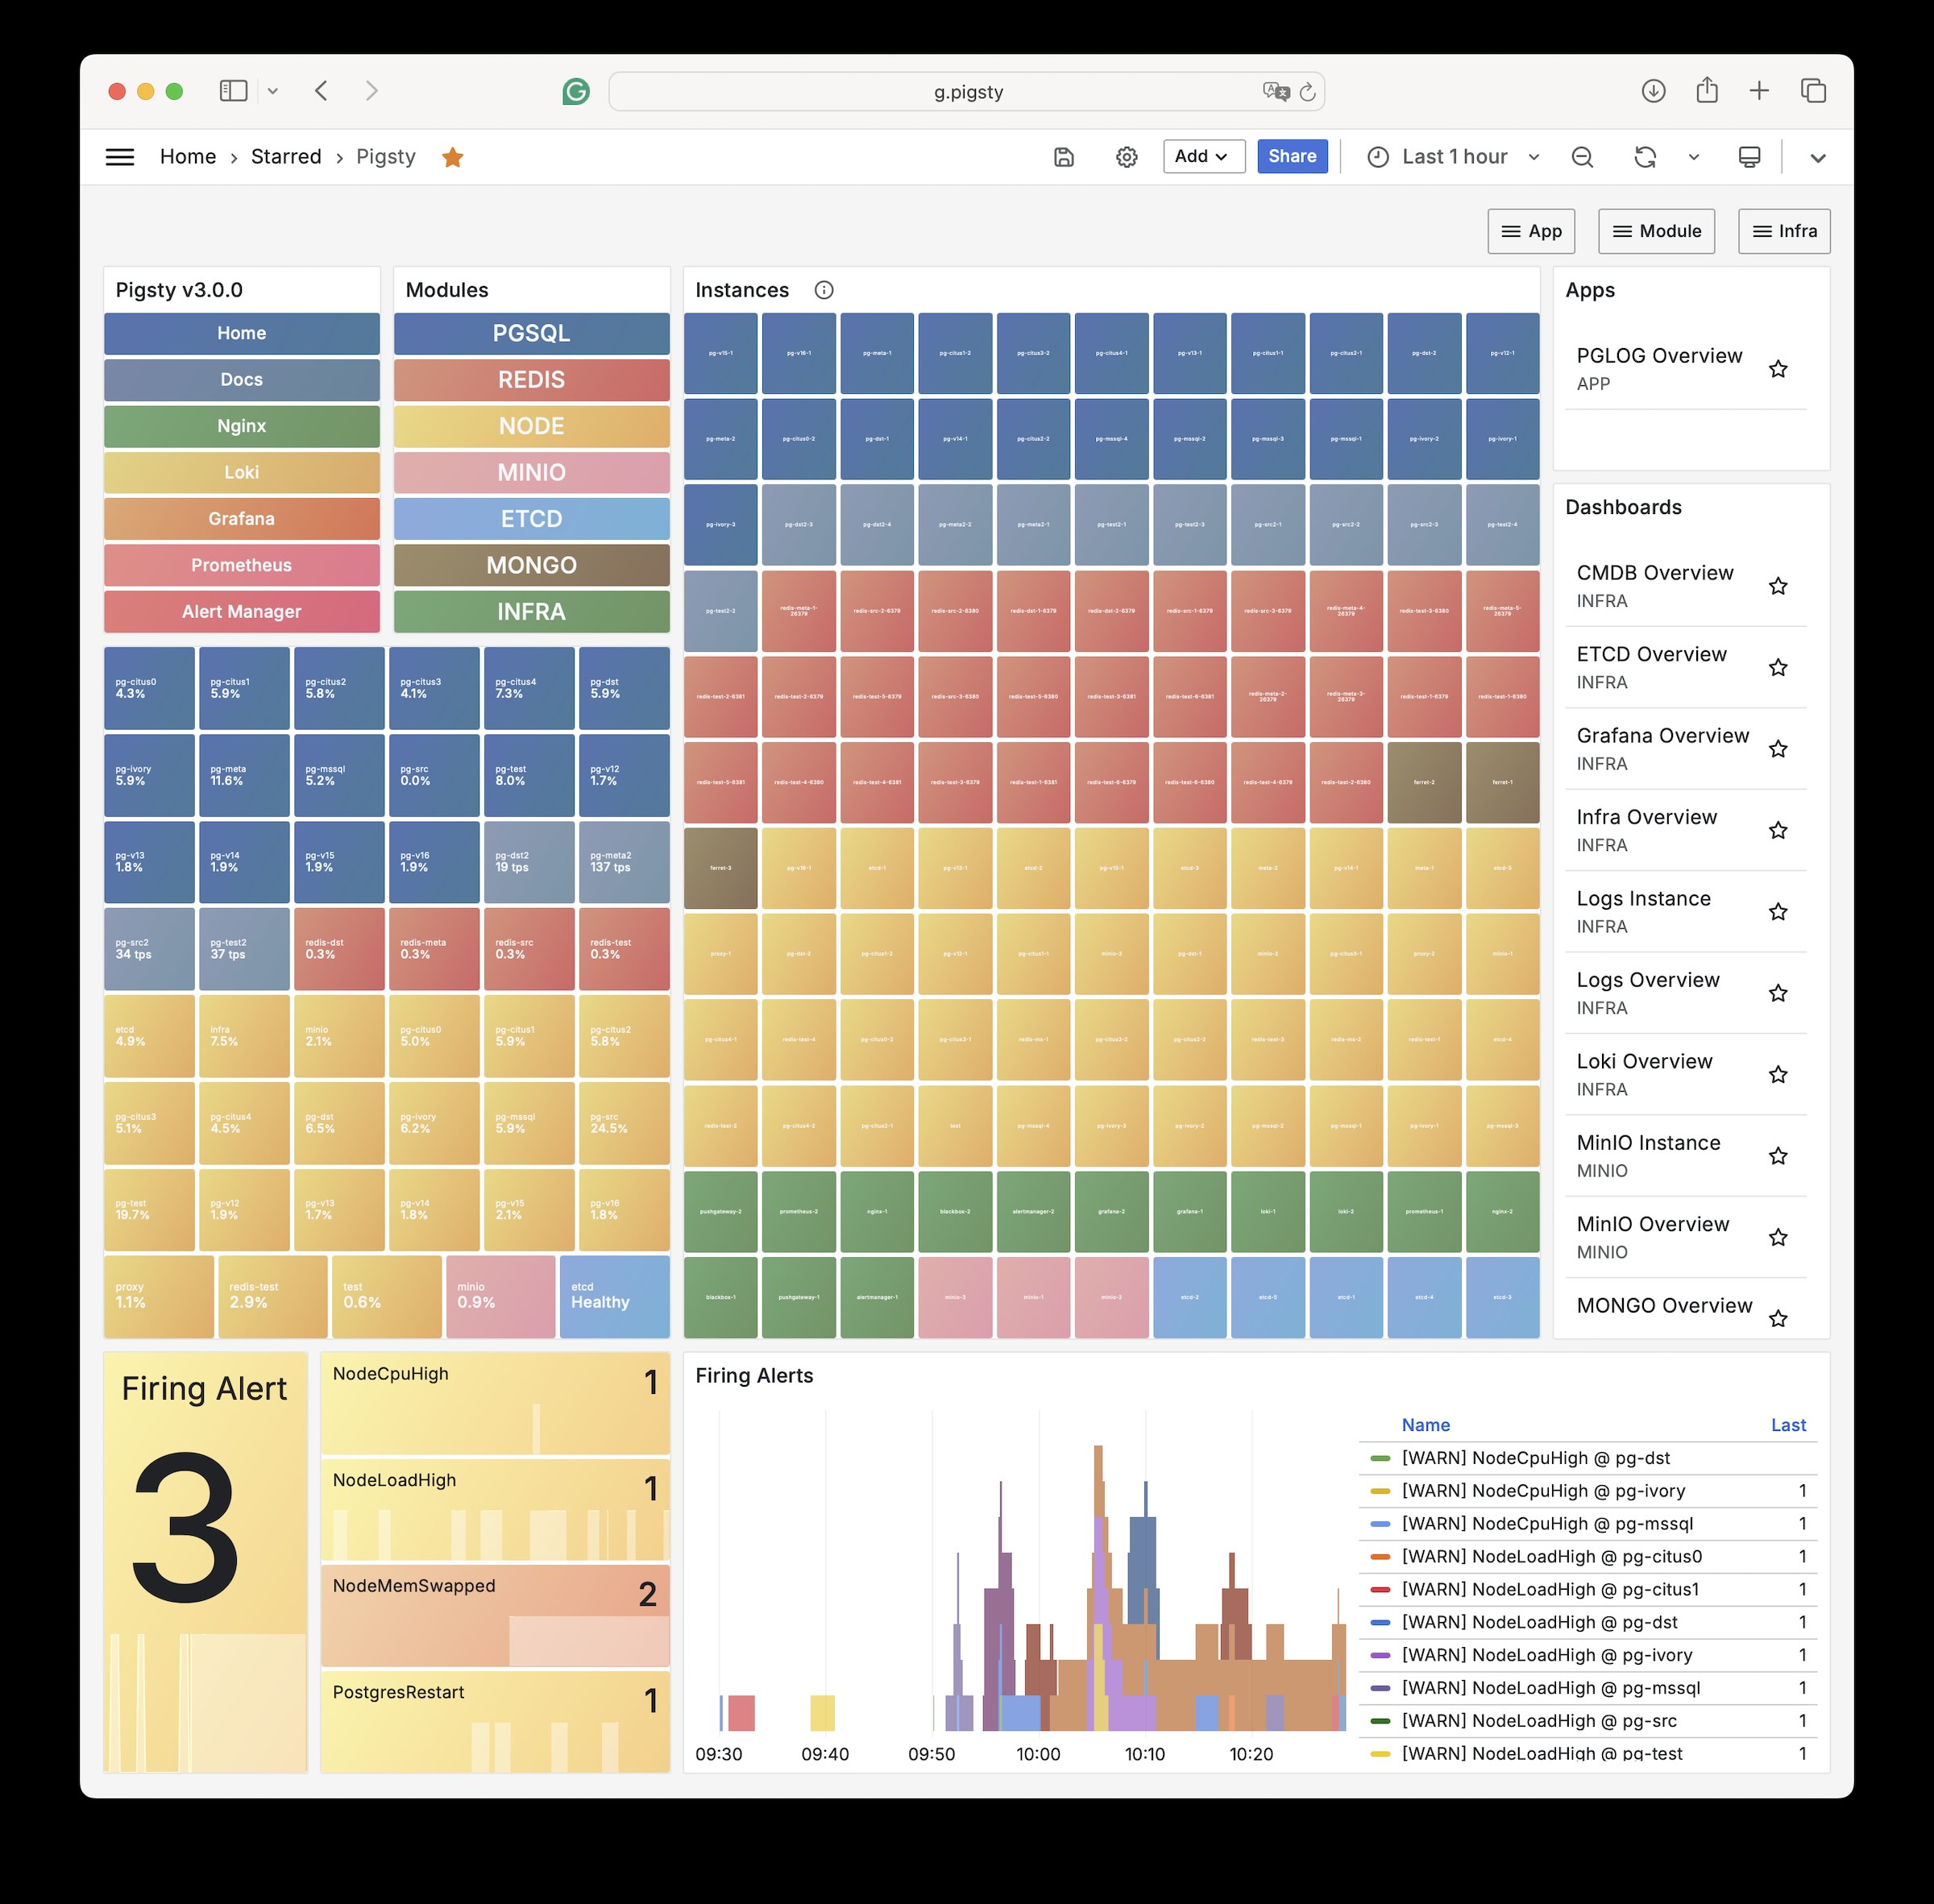
Interface
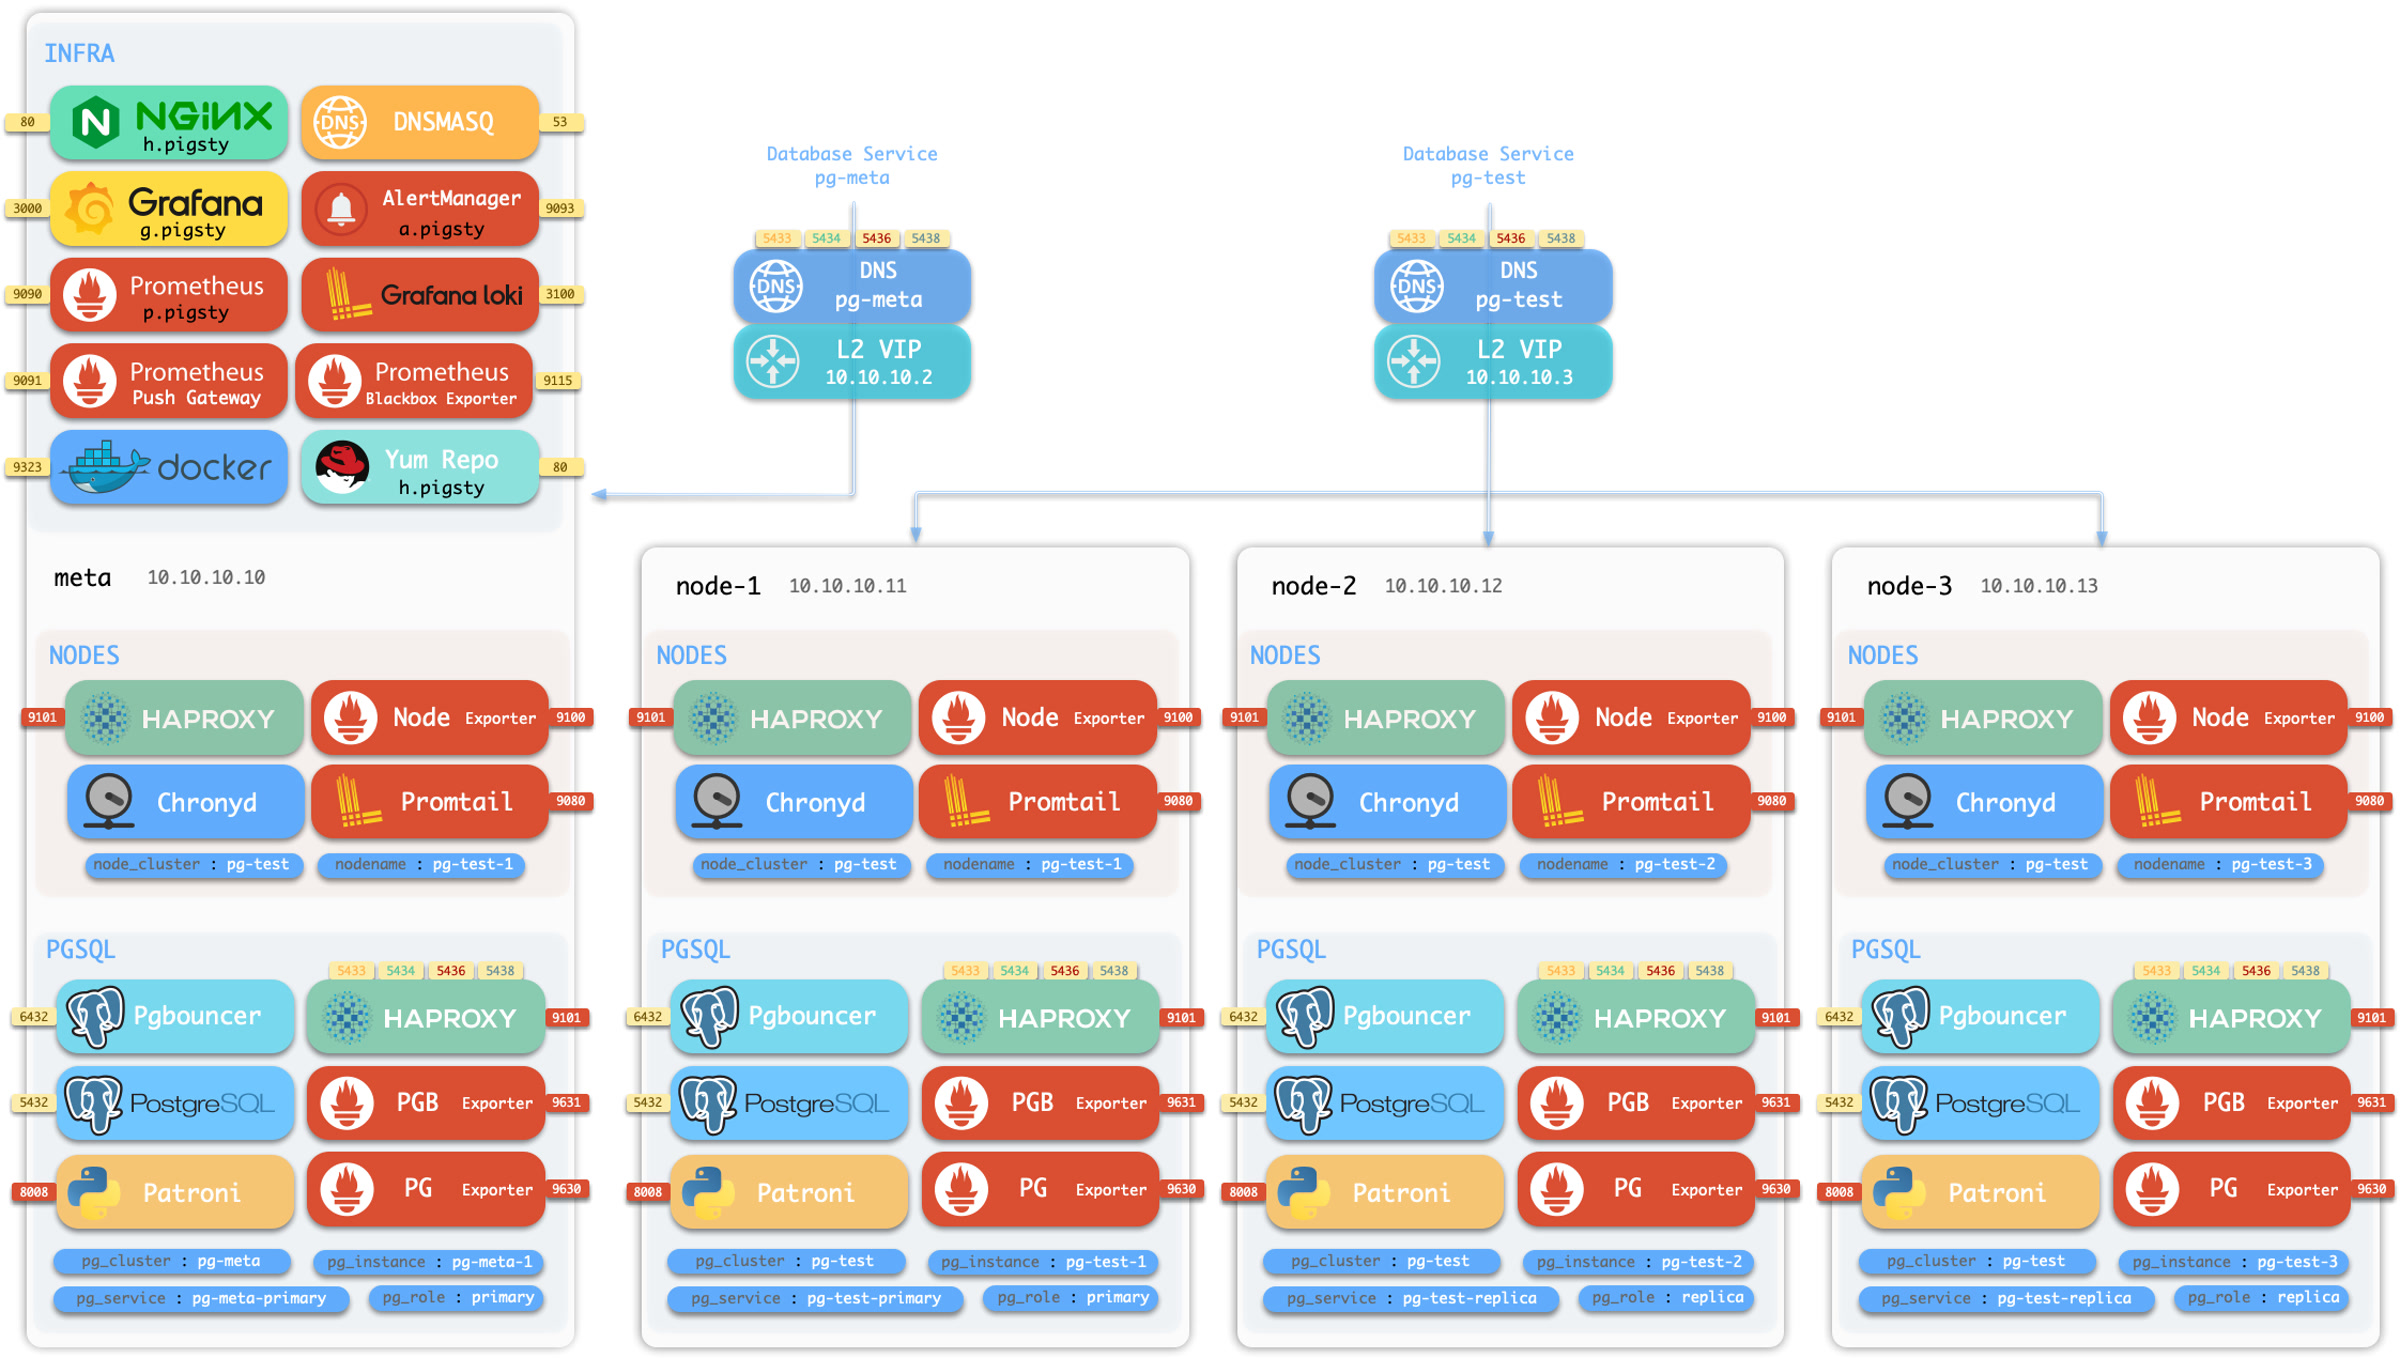
Once installed, you’ll have four core modules PGSQL, INFRA, NODE, and ETCD the current node.
The PGSQL provides a PostgreSQL singleton which can be accessed via:
psql postgres://dbuser_dba:DBUser.DBA@10.10.10.10/meta # DBA / superuser (via IP)psql postgres://dbuser_meta:DBUser.Meta@10.10.10.10/meta # business admin, read / write / ddlpsql postgres://dbuser_view:DBUser.View@pg-meta/meta # read-only userThe INFRA module gives you an entire modern observability stack, exposed by Nginx on (80 / 443):
There are several services are exposed by Nginx (configured by infra_portal):
| Component | Port | Domain | Comment | Public Demo |
|---|---|---|---|---|
| Nginx | 80/443 | h.pigsty |
Web Service Portal, Repo | home.pigsty.cc |
| Grafana | 3000 | g.pigsty |
Grafana Dashboard Home | demo.pigsty.io |
| Prometheus | 9090 | p.pigsty |
Prometheus Web UI | p.pigsty.cc |
| AlertManager | 9093 | a.pigsty |
Alter Aggregator | a.pigsty.cc |
Grafana Dashboards (g.pigsty, port 3000) credentials, user:
admin/ pass:pigsty
You can access these web UI directly via IP + port. While the common best practice would be access them through Nginx and distinguish via domain names. You’ll need configure DNS records, or use the local static records (/etc/hosts) for that.
How to access Pigsty Web UI by domain name?
There are several options:
- Resolve internet domain names through a DNS service provider, suitable for systems accessible from the public internet.
- Configure internal network DNS server resolution records for internal domain name resolution.
- Modify the local machine’s
/etc/hostsfile to add static resolution records. (For Windows, it’s located at:)
We recommend the third method for common users. On the machine (which runs the browser), add the following record into /etc/hosts (sudo required) or C:\Windows\System32\drivers\etc\hosts in Windows:
<your_public_ip_address> h.pigsty a.pigsty p.pigsty g.pigsty
You have to use the external IP address of the node here.
How to configure server side domain names?
The server-side domain name is configured with Nginx. If you want to replace the default domain name, simply enter the domain you wish to use in the parameter infra_portal. When you access the Grafana monitoring homepage via http://g.pigsty, it is actually accessed through the Nginx proxy to Grafana’s WebUI:
http://g.pigsty ️-> http://10.10.10.10:80 (nginx) -> http://10.10.10.10:3000 (grafana)
If nginx_sslmode is set to enabled or enforced, you can trust self-signed ca: files/pki/ca/ca.crt to use https in your browser.
How to use HTTPS in Pigsty WebUI?
Pigsty will generate self-signed certs for Nginx, if you wish to access via HTTPS without “Warning”, here are some options:
- Apply & add real certs from trusted CA: such as Let’s Encrypt
- Trust your generated CA crt as root ca in your OS and browser
- Type
thisisunsafein Chrome will supress the warning
More
You can deploy & monitor more clusters with pigsty: add more nodes to pigsty.yml and run corresponding playbooks:
bin/node-add   pg-test      # init 3 nodes of cluster pg-test
bin/pgsql-add  pg-test      # init HA PGSQL Cluster pg-test
bin/redis-add  redis-ms     # init redis cluster redis-ms
Remember that most modules require the NODE module installed first. Check modules for detail
PGSQL, INFRA, NODE, ETCD, MINIO, REDIS, FERRET, DOCKER, ……
2 - Offline Install
Pigsty’s Installation procedure requires Internet access, but production database servers are often isolated from the Internet.
To address this issue, Pigsty supports offline installation from offline packages, which can help you install Pigsty in an environment without Internet access, and increase the certainty, reliability, speed and consistency of the installation process.
- Build Local Repo
- Make Offline Pacakge
- Use Offline Package
- Compatibility Notes
- Download Pre-made Package
- Bootstrap
Build Local Repo
Pigsty’s install procedure will download all the required rpm/deb packages and all its dependencies from the upstream yum/apt repo, and build a local repo before installing the software.
The repo is served by Nginx and is available to all nodes in the deployment environment, including itself. All the installation will go through this local repo without further internet access.
There are certain benefits to using a local repo:
- It can avoid repetitive download requests and traffic consumption, significantly speeding up the installation and improving its reliability.
- It will take a snapshot of current software versions, ensuring the consistency of the software versions installed across nodes in the environment.
- The snapshot contains all the deps, so it can avoid upstream dependency changes that may cause installation failures. One successful node can ensure all nodes in the same env.
- The built local software repo can be packaged as a whole tarball and copied to an isolated environment with the same operating system for offline installation.
The default location for local repo is /www/pigsty (customizable by nginx_home & repo_name).
The repo will be created by createrepo_c or dpkg_dev according to the OS distro, and referenced by all nodes in the environment through repo_upstream entry with module=local.
You can perform install on one node with the exact same OS version, then copy the local repo directory to another node with the same OS version for offline installation.
A more common practice is to package the local software repo directory into an offline package and copy it to the isolated node for installation.
Make Offline Pacakge
Pigsty offers a cache.yml playbook to make offline package.
For example, the following command will take the local software repo on the infra node /www/pigsty and package it into an offline package, and retrieve it to the local dist/${version} directory.
./cache.yml -l infra
You can customize the output directory and name of the offline package with the cache_pkg_dir and cache_pkg_name parameters.
For example, the following command will fetch the made offline package to files/pkg.tgz.
./cache.yml -l 10.10.10.10 -e '{"cache_pkg_dir":"files","cache_pkg_name":"pkg.tgz"}'
Use Offline Pacakge
The offline package is a tarball made by gzip and tar, and extract to /www/pigsty for use.
sudo rm -rf /www/pigsty ; sudo tar -xf /tmp/pkg.tgz -C /www
The simpler way is to copy the offline package to /tmp/pkg.tgz on the isolated node to be installed,
and Pigsty will automatically unpack it during the bootstrap process and install from it.
When building the local software repo, Pigsty will generate a marker file repo_complete to mark it as a finished Pigsty local software repo.
When Pigsty install.yml playbook finds that the local software repo already exists, it will enter offline install mode.
In offline install mode, pigsty will no longer download software from the internet, but install from the local software repo directly.
Criteria for Offline Install Mode
The criteria for the existence of a local repo is the presence of a marker file located by default at /www/pigsty/repo_complete.
This marker file is automatically generated after the download is complete during the standard installation procedure, indicating a usable local software repo is done.
Deleting the repo_complete marker file of the local repo will mark the procedure for re-download missing packages from upstream.
Compatibility Notes
The software packages (rpm/deb) can be roughly divided into 3 categories:
- INFRA Packages such as Prometheus & Grafana stacks and monitoring agents, which are OS distro/version independent.
- PGSQL Packages such as pgsql kernel & extensions, which are optionally bound to the Linux distro major version.
- NODE Packages such as so libs, utils, deps, which are bound to the Linux distro major & minor version.
Therefore, the compatibility of offline packages depends on the OS major version and minor version because it contains all three types of packages.
Usually, offline packages can be used in an environment with the exact same OS major/minor version. If the major version does not match, INFRA packages can usually be installed successfully, while PGSQL and NODE packages may have missing or conflicting dependencies. If the minor version does not match, INFRA and PGSQL packages can usually be installed successfully, while NODE packages have a chance of success and a chance of failure.
For example, offline packages made on RockLinux 8.9 may have a greater chance of success when offline installed on RockyLinux 8.10 environment.
While offline packages made on Ubuntu 22.04.3 is most likely to fail on Ubuntu 22.04.4.
(Yes the minor version here in Ubuntu is final .3 rather than .04, and the major version is 22.04|jammy)
If the OS minor version is not exactly matched, you can use a hybrid strategy to install, that is, after the bootstrap process,
remove the /www/pigsty/repo_complete marker file, so that Pigsty will re-download the missing NODE packages and related dependencies during the installation process.
Which can effectively solve the dependency conflict problem when using offline packages, and don’t lose the benefits of offline installation.
Download Pre-made Package
Pigsty does not offer pre-made offline packages for download starting from Pigsty v3.0.0.
It will use online installation by default, since it can download the exact NODE packages from the official repo to avoid dependency conflicts. Besides, there are too much maintenance overhead to keep the offline packages for so many OS distros / major / minor version combinations.
BUT, we do offer pre-made offline packages for the following precise OS versions, which include Docker and pljava/jdbc_fw components, ready to use with a fair price.
- RockyLinux 8.10
- RockyLinux 9.5
- Ubuntu 22.04.5
- Debian 12.7
All the integration tests of Pigsty are based on the pre-made offline package snapshot before release, Using these can effectively reduce the delivery risk caused by upstream dependency changes, save you the trouble and waiting time. And show your support for the open-source cause, with a fair price of $99, please contact @Vonng (rh@vonng.com) to get the download link.
We use offline package to deliver our pro version, which is precisely matched to your specific OS distro major/minor version and has been tested after integration.
Offline Package
Therefore, Pigsty offers an offline installation feature, allowing you to complete the installation and deployment in an environment without internet access.
If you have internet access, downloading the pre-made Offline Package in advance can help speed up the installation process and enhance the certainty and reliability of the installation.
Pigsty will no longer provide offline software packages for download starting from v3.0.0
You can make your own with the
bin/cachescript after the standard installation process.Pigsty Pro offers pre-made offline packages for various OS distros.
Bootstrap
Pigsty needs ansible to run the playbooks, so it is not suitable to install Ansible through playbooks.
The Bootstrap script is used to solve this problem: it will try its best to ensure that Ansible is installed on the node before the real installation.
./bootstrap # make suare ansible installed (if offline package available, setup & use offline install)
If you are using offline package, the Bootstrap script will automatically recognize and process the offline package located at /tmp/pkg.tgz, and install Ansible from it if applicable.
Otherwise, if you have internet access, Bootstrap will automatically add the upstrema yum/apt repo of the corresponding OS/region and install Ansible from it.
If neither internet nor offline package is available, Bootstrap will leave it to the user to handle this issue, and the user needs to ensure that the repo configured on the node contains a usable Ansible.
There are some optional parameters for the Bootstrap script, you can use the -p|--path parameter to specify a different offline package location other than /tmp/pkg.tgz. or designate a region with the -r|--region parameter:
./boostrap
   [-r|--region <region]   [default,china,europe]
   [-p|--path <path>]      specify another offline pkg path
   [-k|--keep]             keep existing upstream repo during bootstrap
And bootstrap will automatically backup and remove the current repo (/etc/yum.repos.d/backup / /etc/apt/source.list.d/backup) of the node during the process to avoid software source conflicts. If this is not the behavior you expected, or you have already configured a local software repo, you can use the -k|--keep parameter to keep the existing software repo.
Example: Use offline package (EL8)
Bootstrap with offline package on a RockyLinux 8 node:
[vagrant@el8 pigsty]$ ls -alh /tmp/pkg.tgz
-rw-r--r--. 1 vagrant vagrant 1.4G Sep  1 10:20 /tmp/pkg.tgz
[vagrant@el8 pigsty]$ ./bootstrap
bootstrap pigsty v3.3.0 begin
[ OK ] region = china
[ OK ] kernel = Linux
[ OK ] machine = x86_64
[ OK ] package = rpm,dnf
[ OK ] vendor = rocky (Rocky Linux)
[ OK ] version = 8 (8.9)
[ OK ] sudo = vagrant ok
[ OK ] ssh = vagrant@127.0.0.1 ok
[ OK ] cache = /tmp/pkg.tgz exists
[ OK ] repo = extract from /tmp/pkg.tgz
[WARN] old repos = moved to /etc/yum.repos.d/backup
[ OK ] repo file = use /etc/yum.repos.d/pigsty-local.repo
[WARN] rpm cache = updating, may take a while
pigsty local 8 - x86_64                                                                                                                               49 MB/s | 1.3 MB     00:00
Metadata cache created.
[ OK ] repo cache = created
[ OK ] install el8 utils

........ yum install output
Installed:

  createrepo_c-0.17.7-6.el8.x86_64        createrepo_c-libs-0.17.7-6.el8.x86_64 drpm-0.4.1-3.el8.x86_64   modulemd-tools-0.7-8.el8.noarch python3-createrepo_c-0.17.7-6.el8.x86_64
  python3-libmodulemd-2.13.0-1.el8.x86_64 python3-pyyaml-3.12-12.el8.x86_64     sshpass-1.09-4.el8.x86_64 unzip-6.0-46.el8.x86_64
  ansible-9.2.0-1.el8.noarch                 ansible-core-2.16.3-2.el8.x86_64              git-core-2.43.5-1.el8_10.x86_64                 mpdecimal-2.5.1-3.el8.x86_64
  python3-cffi-1.11.5-6.el8.x86_64           python3-cryptography-3.2.1-7.el8_9.x86_64     python3-jmespath-0.9.0-11.el8.noarch            python3-pycparser-2.14-14.el8.noarch
  python3.12-3.12.3-2.el8_10.x86_64          python3.12-cffi-1.16.0-2.el8.x86_64           python3.12-cryptography-41.0.7-1.el8.x86_64     python3.12-jmespath-1.0.1-1.el8.noarch
  python3.12-libs-3.12.3-2.el8_10.x86_64     python3.12-pip-wheel-23.2.1-4.el8.noarch      python3.12-ply-3.11-2.el8.noarch                python3.12-pycparser-2.20-2.el8.noarch
  python3.12-pyyaml-6.0.1-2.el8.x86_64

Complete!
[ OK ] ansible = ansible [core 2.16.3]
[ OK ] boostrap pigsty complete
proceed with ./configure
Example: Bootstrap from Internet without offline Package (Debian 12)
On a debian 12 node with internet access, Pigsty add the upstream repo and install ansible and its dependencies using apt:
vagrant@d12:~/pigsty$ ./bootstrap
bootstrap pigsty v3.3.0 begin
[ OK ] region = china
[ OK ] kernel = Linux
[ OK ] machine = x86_64
[ OK ] package = deb,apt
[ OK ] vendor = debian (Debian GNU/Linux)
[ OK ] version = 12 (12)
[ OK ] sudo = vagrant ok
[ OK ] ssh = vagrant@127.0.0.1 ok
[WARN] old repos = moved to /etc/apt/backup
[ OK ] repo file = add debian bookworm china upstream
[WARN] apt cache = updating, may take a while

....... apt install output

[ OK ] ansible = ansible [core 2.14.16]
[ OK ] boostrap pigsty complete
proceed with ./configure
Example: Bootstrap from the Default (Ubuntu 20.04)
One an Ubuntu 20.04 node without internet access & offline package, Pigsty will assume you already have resolved this issue with your own way: Such as a local software repo / mirror / CDROM / intranet repo, etc…
You can explicitly keep the current repo config with the -k parameter, or Pigsty will keep it by default if it detects no internet access and no offline package.
vagrant@ubuntu20:~/pigsty$ ./bootstrap -k
bootstrap pigsty v3.3.0 begin
[ OK ] region = china
[ OK ] kernel = Linux
[ OK ] machine = x86_64
[ OK ] package = deb,apt
[ OK ] vendor = ubuntu (Ubuntu)
[ OK ] version = 20 (20.04)
[ OK ] sudo = vagrant ok
[WARN] ubuntu 20 focal does not have corresponding offline package, use online install
[WARN] cache = missing and skip download
[WARN] repo = skip (/tmp/pkg.tgz not exists)
[ OK ] repo file = add ubuntu focal china upstream
[WARN] apt cache = updating, make take a while

...(apt update/install output)

[ OK ] ansible = ansible 2.10.8
[ OK ] boostrap pigsty complete
proceed with ./configure
3 - Slim Installation
Pigsty has an entire infrastructure stack as an enclosure of HA PostgreSQL clusters, BUT it is viable to install only the PostgreSQL components without the rest of the stack. This is called a slim installation.
Overview
The slim installation focus on Pure HA-PostgreSQL Cluster, and it only installs essential components for this purpose.
There’s NO Infra modules, No monitoring, No local repo Just partial of NODE module, along with ETCD & PGSQL modules
Systemd Service Installed in this mode:
- patroni: REQUIRED, bootstrap HA PostgreSQL cluster
- etcd: REQUIRED, DCS for patroni
- pgbouncer: OPTIONAL, connection pooler for postgres
- vip-manager: OPTIONAL, if you want to use a L2 VIP bind to primary
- haproxy: OPTIONAL, if you wish to auto-routing service
- chronyd: OPTIONAL, if you wish to sync time with NTP server
- tuned: OPTIONAL, manage node template and kernel parameters
You can turn off the optional components, the only two essential components are patroni and etcd.
Configure
To perform a slim installation, you need to disable some switches in the pigsty.yml config file: (Example: conf/slim.yml)
all:
  children:

    # actually not used
    infra: { hosts: { 10.10.10.10: { infra_seq: 1 } } }

    #----------------------------------#
    # etcd cluster for HA postgres DCS
    #----------------------------------#
    etcd:
      hosts:
        10.10.10.10: { etcd_seq: 1 }
      vars:
        etcd_cluster: etcd

    # postgres cluster 'pg-meta' with 2 instances
    pg-meta:
      hosts:
        10.10.10.10: { pg_seq: 1, pg_role: primary }
        10.10.10.11: { pg_seq: 2, pg_role: replica }
      vars:
        pg_cluster: pg-meta
        pg_databases: [ { name: meta ,baseline: cmdb.sql ,comment: pigsty meta database ,schemas: [pigsty] ,extensions: [{name: vector}]}]
        pg_users:
          - { name: dbuser_meta ,password: DBUser.Meta   ,pgbouncer: true ,roles: [ dbrole_admin ]    ,comment: pigsty admin user }
          - { name: dbuser_view ,password: DBUser.Viewer ,pgbouncer: true ,roles: [ dbrole_readonly ] ,comment: read-only viewer for meta database }
        node_crontab: [ '00 01 * * * postgres /pg/bin/pg-backup full' ] # make a full backup every 1am

  vars:                               # global parameters
    version: v3.4.1                   # pigsty version string
    admin_ip: 10.10.10.10             # admin node ip address
    region: default                   # upstream mirror region: default,china,europe
    node_tune: oltp                   # node tuning specs: oltp,olap,tiny,crit
    pg_conf: oltp.yml                 # pgsql tuning specs: {oltp,olap,tiny,crit}.yml

    # slim installation setup
    nginx_enabled: false              # nginx not exists
    dns_enabled: false                # dnsmasq not exists
    prometheus_enabled: false         # prometheus not exists
    grafana_enabled: false            # grafana not exists
    pg_exporter_enabled: false        # disable pg_exporter
    pgbouncer_exporter_enabled: false
    pg_vip_enabled: false

    #----------------------------------#
    # Repo, Node, Packages
    #----------------------------------#
    # if you wish to customize your own repo, change these settings:
    repo_modules: infra,node,pgsql
    repo_remove: true                 # remove existing repo on admin node during repo bootstrap
    node_repo_modules: local          # install the local module in repo_upstream for all nodes
    node_repo_remove: true            # remove existing node repo for node managed by pigsty
    repo_packages: [ node-bootstrap, infra-package, infra-addons, node-package1, node-package2, pgsql-common ] #,docker]
    repo_extra_packages: [ pg17-main ] #,pg17-core ,pg17-time ,pg17-gis ,pg17-rag ,pg17-fts ,pg17-olap ,pg17-feat ,pg17-lang ,pg17-type ,pg17-util ,pg17-func ,pg17-admin ,pg17-stat ,pg17-sec ,pg17-fdw ,pg17-sim ,pg17-etl]
    pg_version: 17                    # default postgres version
    #pg_extensions: [pg17-time ,pg17-gis ,pg17-rag ,pg17-fts ,pg17-feat ,pg17-lang ,pg17-type ,pg17-util ,pg17-func ,pg17-admin ,pg17-stat ,pg17-sec ,pg17-fdw ,pg17-sim ,pg17-etl ] #,pg17-olap]
And use the slim.yml playbook instead of the install.yml playbook:
./slim.yml
4 - Configuration
Pigsty treats Infra & Database as Code. You can describe the infrastructure & database clusters through a declarative interface. All your essential work is to describe your need in the inventory, then materialize it with a simple idempotent playbook.
Inventory
Each pigsty deployment has a corresponding config inventory. It could be stored in a local git-managed file in YAML format
or dynamically generated from CMDB or any ansible compatible format.
Pigsty uses a monolith YAML config file as the default config inventory, which is pigsty.yml, located in the pigsty home directory.
The inventory consists of two parts: global vars & multiple group definitions. You can define new clusters with inventory groups: all.children.
And describe infra and set global default parameters for clusters with global vars: all.vars. Which may look like this:
all:                  # Top-level object: all
  vars: {...}         # Global Parameters
  children:           # Group Definitions
    infra:            # Group Definition: 'infra'
      hosts: {...}        # Group Membership: 'infra'
      vars:  {...}        # Group Parameters: 'infra'
    etcd:    {...}    # Group Definition: 'etcd'
    pg-meta: {...}    # Group Definition: 'pg-meta'
    pg-test: {...}    # Group Definition: 'pg-test'
    redis-test: {...} # Group Definition: 'redis-test'
    # ...
There are lots of config examples under conf/
Cluster
Each group may represent a cluster, which could be a Node cluster, PostgreSQL cluster, Redis cluster, Etcd cluster, or Minio cluster, etc…
They all use the same format: group vars & hosts. You can define cluster members with all.children.<cls>.hosts and describe cluster with cluster parameters in all.children.<cls>.vars.
Here is an example of 3 nodes PostgreSQL HA cluster named pg-test:
pg-test:   # Group Name
  vars:    # Group Vars (Cluster Parameters)
    pg_cluster: pg-test
  hosts:   # Group Host (Cluster Membership)
    10.10.10.11: { pg_seq: 1, pg_role: primary } # Host1
    10.10.10.12: { pg_seq: 2, pg_role: replica } # Host2
    10.10.10.13: { pg_seq: 3, pg_role: offline } # Host3
You can also define parameters for a specific host, as known as host vars. It will override group vars and global vars. Which is usually used for assigning identities to nodes & database instances.
Parameter
Global vars, Group vars, and Host vars are dict objects consisting of a series of K-V pairs. Each pair is a named Parameter consisting of a string name as the key and a value of one of five types: boolean, string, number, array, or object. Check parameter reference for detailed syntax & semantics.
Every parameter has a proper default value except for mandatory IDENTITY PARAMETERS; they are used as identifiers and must be set explicitly, such as pg_cluster, pg_role, and pg_seq.
Parameters can be specified & overridden with the following precedence.
Playbook Args > Host Vars > Group Vars > Global Vars > Defaults
For examples:
- Force removing existing databases with Playbook CLI Args
-e pg_clean=true - Override an instance role with Instance Level Parameter
pg_roleon Host Vars - Override a cluster name with Cluster Level Parameter
pg_clusteron Group Vars. - Specify global NTP servers with Global Parameter
node_ntp_serverson Global Vars - If no
pg_versionis set, it will use the default value from role implementation (16 by default)
Template
There are numerous preset config templates for different scenarios under the conf/ directory.
During configure process, you can specify a template using the -c parameter.
Otherwise, the single-node installation config template will be automatically selected based on your OS distribution.
Details about this built-in configuration files can be found @ Configuration
Switch Config Inventory
To use a different config inventory, you can copy & paste the content into the pigsty.yml file in the home dir as needed.
You can also explicitly specify the config inventory file to use when executing Ansible playbooks by using the -i command-line parameter, for example:
./node.yml -i conf/rich.yml # use another file as config inventory, rather than the default pigsty.yml
If you want to modify the default config inventory filename, you can change the inventory parameter in the ansible.cfg file in the home dir to point to your own inventory file path.
This allows you to run the ansible-playbook command without explicitly specifying the -i parameter.
Pigsty allows you to use a database (CMDB) as a dynamic configuration source instead of a static configuration file. Pigsty provides three convenient scripts:
bin/inventory_load: Loads the content of thepigsty.ymlinto the local PostgreSQL database (meta.pigsty)bin/inventory_cmdb: Switches the configuration source to the local PostgreSQL database (meta.pigsty)bin/inventory_conf: Switches the configuration source to the local static configuration filepigsty.yml
Reference
Pigsty have 280+ parameters, check Parameter for details.
| Module | Section | Description | Count |
|---|---|---|---|
INFRA |
META |
Pigsty Metadata | 4 |
INFRA |
CA |
Self-Signed CA | 3 |
INFRA |
INFRA_ID |
Infra Portals & Identity | 2 |
INFRA |
REPO |
Local Software Repo | 9 |
INFRA |
INFRA_PACKAGE |
Infra Packages | 2 |
INFRA |
NGINX |
Nginx Web Server | 7 |
INFRA |
DNS |
DNSMASQ Nameserver | 3 |
INFRA |
PROMETHEUS |
Prometheus Stack | 18 |
INFRA |
GRAFANA |
Grafana Stack | 6 |
INFRA |
LOKI |
Loki Logging Service | 4 |
NODE |
NODE_ID |
Node Identity Parameters | 5 |
NODE |
NODE_DNS |
Node domain names & resolver | 6 |
NODE |
NODE_PACKAGE |
Node Repo & Packages | 5 |
NODE |
NODE_TUNE |
Node Tuning & Kernel features | 10 |
NODE |
NODE_ADMIN |
Admin User & Credentials | 7 |
NODE |
NODE_TIME |
Node Timezone, NTP, Crontabs | 5 |
NODE |
NODE_VIP |
Node Keepalived L2 VIP | 8 |
NODE |
HAPROXY |
HAProxy the load balancer | 10 |
NODE |
NODE_EXPORTER |
Node Monitoring Agent | 3 |
NODE |
PROMTAIL |
Promtail logging Agent | 4 |
DOCKER |
DOCKER |
Docker Daemon | 4 |
ETCD |
ETCD |
ETCD DCS Cluster | 10 |
MINIO |
MINIO |
MINIO S3 Object Storage | 15 |
REDIS |
REDIS |
Redis the key-value NoSQL cache | 20 |
PGSQL |
PG_ID |
PG Identity Parameters | 11 |
PGSQL |
PG_BUSINESS |
PG Business Object Definition | 12 |
PGSQL |
PG_INSTALL |
Install PG Packages & Extensions | 10 |
PGSQL |
PG_BOOTSTRAP |
Init HA PG Cluster with Patroni | 39 |
PGSQL |
PG_PROVISION |
Create in-database objects | 9 |
PGSQL |
PG_BACKUP |
Set Backup Repo with pgBackRest | 5 |
PGSQL |
PG_SERVICE |
Exposing service, bind vip, dns | 9 |
PGSQL |
PG_EXPORTER |
PG Monitor agent for Prometheus | 15 |
5 - Preparation
Node
Pigsty supports the Linux kernel and x86_64/aarch64 arch, applicable to any node.
A “node” refers to a resource that is SSH accessible and offers a bare OS environment, such as a physical machine, a virtual machine, or an OS container equipped with systemd and sshd.
Deploying Pigsty requires at least 1 node. The minimum spec requirement is 1C1G, but it is recommended to use at least 2C4G, with no upper limit: parameters will automatically optimize and adapt.
For demos, personal sites, devbox, or standalone monitoring infra, 1-2 nodes are recommended, while at least 3 nodes are suggested for an HA PostgreSQL cluster. For critical scenarios, 4-5 nodes are advisable.
Leverage IaC Tools for chores
Managing a large-scale prod env could be tedious and error-prone. We recommend using Infrastructure as Code (IaC) tools to address these issues.
You can use the Terraform and Vagrant templates provided by Pigsty, to create the required node environment with just one command through IaC, provisioning network, OS image, admin user, privileges, etc…
Network
Pigsty requires nodes to use static IPv4 addresses, which means you should explicitly assign your nodes a specific fixed IP address rather than using DHCP-assigned addresses.
The IP address used by a node should be the primary IP address for internal network communications and will serve as the node’s unique identifier.
If you wish to use the optional Node VIP and PG VIP features, ensure all nodes are located within an L2 network.
Your firewall policy should ensure the required ports are open between nodes. For a detailed list of ports required by different modules, refer to Node: Ports.
Which Ports Should Be Exposed?
For beginners or those who are just trying it out, you can just open ports 5432 (PostgreSQL database) and 3000 (Grafana visualization interface) to the world.
For a serious prod env, you should only expose the necessary ports to the exterior, such as 80/443 for web services, open to the office network (or the entire Internet).
Exposing database service ports directly to the Internet is not advisable. If you need to do this, consider consulting Security Best Practices and proceed cautiously.
The method for exposing ports depends on your network implementation, such as security group policies, local iptables records, firewall configurations, etc.
Operating System
Pigsty supports various Linux OS. We recommend using RockyLinux 9.4 or Ubuntu 22.04.5 as the default OS for installing Pigsty.
Pigsty supports RHEL (7,8,9), Debian (11,12), Ubuntu (20,22,24), and many other compatible OS distros. Check Compatibility For a complete list of compatible OS distros.
When deploying on multiple nodes, we strongly recommend using the same version of the OS distro and the Linux kernel on all nodes.
We strongly recommend using a clean, minimally installed OS environment with en_US set as the primary language.
How to enable en_US locale?
To ensure the en_US locale is available when using other primary language:
yum install -y glibc-locale-source glibc-langpack-en
localedef -i en_US -f UTF-8 en_US.UTF-8
localectl set-locale LANG=en_US.UTF-8
Note: The PostgreSQL cluster deployed by Pigsty defaults to the C.UTF8 locale, but character set definitions use en_US to ensure the pg_trgm extension functions properly.
If you do not need this feature, you can configure the value of pg_lc_ctype to C.UTF8 to avoid this issue when en locale is missing.
Admin User
You’ll need an “admin user” on all nodes where Pigsty is meant to be deployed — an OS user with nopass ssh login and nopass sudo permissions.
On the nodes where Pigsty is installed, you need an “administrative user” who has nopass ssh login and nopass sudo permissions.
No password sudo is required to execute commands during the installation process, such as installing packages, configuring system settings, etc.
How to configure nopass sudo for admin user?
Assuming your admin username is vagrant, you can create a file in /etc/sudoers.d/vagrant and add the following content:
%vagrant ALL=(ALL) NOPASSWD: ALL
This will allow the vagrant user to execute all commands without a sudo password. If your username is not vagrant, replace vagrant in the above steps with your username.
Avoid using the root user
While it is possible to install Pigsty using the root user, we do not recommend it.
We recommend using a dedicated admin user, such as dba, different from the root user (root) and the database superuser (postgres).
There is a dedicated playbook subtask that can use an existing admin user (e.g., root) with ssh/sudo password input to create a dedicated admin user.
SSH Permission
In addition to nopass sudo privilege, Pigsty also requires the admin user to have nopass ssh login privilege (login via ssh key).
For single-host installations setup, this means the admin user on the local node should be able to log in to the host itself via ssh without a password.
If your Pigsty deployment involves multiple nodes, this means the admin user on the admin node
should be able to log in to all nodes managed by Pigsty (including the local node) via ssh without a password, and execute sudo commands without a password as well.
During the configure procedure, if your current admin user does not have any SSH key,
it will attempt to address this issue by generating a new id_rsa key pair and adding it to the local ~/.ssh/authorized_keys file to ensure local SSH login capability for the local admin user.
By default, Pigsty creates an admin user dba (uid=88) on all managed nodes. If you are already using this user,
we recommend that you change the node_admin_username to a new username with a different uid,
or disable it using the node_admin_enabled parameter.
How to configure nopass SSH login for admin user?
Assuming your admin username is vagrant, execute the following command as the vagrant user will generate a
public/private key pair for login. If a key pair already exists, there is no need to generate a new one.
ssh-keygen -t rsa -b 2048 -N '' -f ~/.ssh/id_rsa -q
The generated public key is by default located at: /home/vagrant/.ssh/id_rsa.pub, and the private key at: /home/vagrant/.ssh/id_rsa.
If your OS username is not vagrant, replace vagrant in the above commands with your username.
You should append the public key file (id_rsa.pub) to the authorized_keys file of the user you need to log into: /home/vagrant/.ssh/authorized_keys.
If you already have password access to the remote machine, you can use ssh-copy-id to copy the public key:
ssh-copy-id <ip>                        # Enter password to complete public key copying
sshpass -p <password> ssh-copy-id <ip>  # Or: you can embed the password directly in the command to avoid interactive password entry (cautious!)
Pigsty recommends provisioning the admin user during node provisioning and making it viable by default.
SSH Accessibility
If your environment has some restrictions on SSH access, such as a bastion server or ad hoc firewall rules that prevent simple SSH access via ssh <ip>, consider using SSH aliases.
For example, if there’s a node with IP 10.10.10.10 that can not be accessed directly via ssh but can be accessed via an ssh alias meta defined in ~/.ssh/config,
then you can configure the ansible_host parameter for that node in the inventory to specify the SSH Alias on the host level:
nodes:
  hosts:  # 10.10.10.10 can not be accessed directly via ssh, but can be accessed via ssh alias 'meta'
    10.10.10.10: { ansible_host: meta }
If the ssh alias does not meet your requirement, there are a plethora of custom ssh connection parameters that can bring fine-grained control over SSH connection behavior.
If the following cmd can be successfully executed on the admin node by the admin user, it means that the target node’s admin user is properly configured.
ssh <ip|alias> 'sudo ls'
Software
On the admin node, Pigsty requires ansible to initiate control.
If you are using the singleton meta installation, Ansible is required on this node. It is not required for common nodes.
The bootstrap procedure will make every effort to do this for you.
But you can always choose to install Ansible manually. The process of manually installing Ansible
varies with different OS distros / major versions (usually involving an additional weak dependency jmespath):
sudo dnf install -y ansible python3.12-jmespathsudo yum install -y ansible # EL7 does not need to install jmespath explicitlysudo apt install -y ansible python3-jmespathbrew install ansibleTo install Pigsty, you also need to prepare the Pigsty source package. You can directly download a specific version from the GitHub Release page or use the following command to obtain the latest stable version:
curl -fsSL https://repo.pigsty.io/get | bash
If your env does not have Internet access, consider using the offline packages, which are pre-packed for different OS distros, and can be downloaded from the GitHub Release page.
6 - Playbooks
Playbooks are used in Pigsty to install modules on nodes.
To run playbooks, just treat them as executables. e.g. run with ./install.yml.
Playbooks
Here are default playbooks included in Pigsty.
| Playbook | Function |
|---|---|
install.yml |
Install Pigsty on current node in one-pass |
infra.yml |
Init pigsty infrastructure on infra nodes |
infra-rm.yml |
Remove infrastructure components from infra nodes |
node.yml |
Init node for pigsty, tune node into desired status |
node-rm.yml |
Remove node from pigsty |
pgsql.yml |
Init HA PostgreSQL clusters, or adding new replicas |
pgsql-rm.yml |
Remove PostgreSQL cluster, or remove replicas |
pgsql-user.yml |
Add new business user to existing PostgreSQL cluster |
pgsql-db.yml |
Add new business database to existing PostgreSQL cluster |
pgsql-monitor.yml |
Monitor remote postgres instance with local exporters |
pgsql-migration.yml |
Generate Migration manual & scripts for existing PostgreSQL |
redis.yml |
Init redis cluster/node/instance |
redis-rm.yml |
Remove redis cluster/node/instance |
etcd.yml |
Init etcd cluster (required for patroni HA DCS) |
minio.yml |
Init minio cluster (optional for pgbackrest repo) |
docker.yml |
Install docker on nodes |
mongo.yml |
Install Mongo/FerretDB on nodes |
cert.yml |
Issue cert with pigsty self-signed CA (e.g. for pg clients) |
cache.yml |
Make offline install packages from target node |
One-Pass Install
The special playbook install.yml is actually a composed playbook that install everything on current environment.
  playbook  / command / group         infra           nodes    etcd     minio     pgsql
[infra.yml] ./infra.yml [-l infra]   [+infra][+node]
[node.yml]  ./node.yml                               [+node]  [+node]  [+node]   [+node]
[etcd.yml]  ./etcd.yml  [-l etcd ]                            [+etcd]
[minio.yml] ./minio.yml [-l minio]                                     [+minio]
[pgsql.yml] ./pgsql.yml                                                          [+pgsql]
Note that there’s a circular dependency between NODE and INFRA:
to register a NODE to INFRA, the INFRA should already exist, while the INFRA module relies on NODE to work.
The solution is that INFRA playbook will also install NODE module in addition to INFRA on infra nodes.
Make sure that infra nodes are init first. If you really want to init all nodes including infra in one-pass, install.yml is the way to go.
Ansible
Playbooks require ansible-playbook executable to run, playbooks which is included in ansible rpm / deb package.
Pigsty will try it’s best to install ansible on admin node during bootstrap.
You can install it by yourself with yum|apt|brew install ansible, it is included in default OS repo.
Knowledge about ansible is good but not required. Only four parameters needs your attention:
-l|--limit <pattern>: Limit execution target on specific group/host/pattern (Where)-t|--tags <tags>: Only run tasks with specific tags (What)-e|--extra-vars <vars>: Extra command line arguments (How)-i|--inventory <path>: Using another inventory file (Conf)
Designate Inventory
To use a different config inventory, you can copy & paste the content into the pigsty.yml file in the home dir as needed.
The active inventory file can be specified with the -i|--inventory <path> parameter when running Ansible playbooks.
./pgsql.yml -i conf/rich.yml            # initialize a single node with all extensions downloaded according to rich config
./pgsql.yml -i conf/full.yml            # initialize a four-node cluster according to full config
./pgsql.yml -i conf/app/supa.yml        # initialize a single-node Supabase deployment according to supa.yml config
If you wish to permanently modify the default config inventory filename, you can change the inventory parameter in the ansible.cfg
Limit Host
The target of playbook can be limited with -l|-limit <selector>.
Missing this value could be dangerous since most playbooks will execute on all host, DO USE WITH CAUTION.
Here are some examples of host limit:
./pgsql.yml                 # run on all hosts (very dangerous!)
./pgsql.yml -l pg-test      # run on pg-test cluster
./pgsql.yml -l 10.10.10.10  # run on single host 10.10.10.10
./pgsql.yml -l pg-*         # run on host/group matching glob pattern `pg-*`
./pgsql.yml -l '10.10.10.11,&pg-test'     # run on 10.10.10.10 of group pg-test
/pgsql-rm.yml -l 'pg-test,!10.10.10.11'   # run on pg-test, except 10.10.10.11
./pgsql.yml -l pg-test      # Execute the pgsql playbook against the hosts in the pg-test cluster
Limit Tags
You can execute a subset of playbook with -t|--tags <tags>.
You can specify multiple tags in comma separated list, e.g. -t tag1,tag2.
If specified, tasks with given tags will be executed instead of entire playbook.
Here are some examples of task limit:
./pgsql.yml -t pg_clean    # cleanup existing postgres if necessary
./pgsql.yml -t pg_dbsu     # setup os user sudo for postgres dbsu
./pgsql.yml -t pg_install  # install postgres packages & extensions
./pgsql.yml -t pg_dir      # create postgres directories and setup fhs
./pgsql.yml -t pg_util     # copy utils scripts, setup alias and env
./pgsql.yml -t patroni     # bootstrap postgres with patroni
./pgsql.yml -t pg_user     # provision postgres business users
./pgsql.yml -t pg_db       # provision postgres business databases
./pgsql.yml -t pg_backup   # init pgbackrest repo & basebackup
./pgsql.yml -t pgbouncer   # deploy a pgbouncer sidecar with postgres
./pgsql.yml -t pg_vip      # bind vip to pgsql primary with vip-manager
./pgsql.yml -t pg_dns      # register dns name to infra dnsmasq
./pgsql.yml -t pg_service  # expose pgsql service with haproxy
./pgsql.yml -t pg_exporter # expose pgsql service with haproxy
./pgsql.yml -t pg_register # register postgres to pigsty infrastructure

# run multiple tasks: reload postgres & pgbouncer hba rules
./pgsql.yml -t pg_hba,pg_reload,pgbouncer_hba,pgbouncer_reload

# run multiple tasks: refresh haproxy config & reload it
./node.yml -t haproxy_config,haproxy_reload
Extra Vars
Extra command-line args can be passing via -e|-extra-vars KEY=VALUE.
It has the highest precedence over all other definition.
Here are some examples of extra vars
./node.yml -e ansible_user=admin -k -K   # run playbook as another user (with admin sudo password)
./pgsql.yml -e pg_clean=true             # force purging existing postgres when init a pgsql instance
./pgsql-rm.yml -e pg_uninstall=true      # explicitly uninstall rpm after postgres instance is removed
./redis.yml -l 10.10.10.10 -e redis_port=6379 -t redis  # init a specific redis instance: 10.10.10.11:6379
./redis-rm.yml -l 10.10.10.13 -e redis_port=6379        # remove a specific redis instance: 10.10.10.11:6379
You can also pass complex parameters like array and object via JSON:
# install duckdb packages on node with specified upstream repo module
./node.yml -t node_repo,node_pkg  -e '{"node_repo_modules":"infra","node_default_packages":["duckdb"]}'
Most playbooks are idempotent, meaning that some deployment playbooks may erase existing databases and create new ones without the protection option turned on.
Please read the documentation carefully, proofread the commands several times, and operate with caution. The author is not responsible for any loss of databases due to misuse.
7 - Provisioning
Pigsty runs on nodes, which are Bare Metals or Virtual Machines. You can prepare them manually, or using terraform & vagrant for provisioning.
Sandbox
Pigsty has a sandbox, which is a 4-node deployment with fixed IP addresses and other identifiers.
Check conf/full.yml for details.
The sandbox consists of 4 nodes with fixed IP addresses: 10.10.10.10, 10.10.10.11, 10.10.10.12, 10.10.10.13.
There’s a primary singleton PostgreSQL cluster: pg-meta on the meta node, which can be used alone if you don’t care about PostgreSQL high availability.
meta 10.10.10.10 pg-meta pg-meta-1
There are 3 additional nodes in the sandbox, form a 3-instance PostgreSQL HA cluster pg-test.
node-1 10.10.10.11 pg-test.pg-test-1node-2 10.10.10.12 pg-test.pg-test-2node-3 10.10.10.13 pg-test.pg-test-3
Two optional L2 VIP are bind on primary instances of cluster pg-meta and pg-test:
10.10.10.2 pg-meta10.10.10.3 pg-test
There’s also a 1-instance etcd cluster, and 1-instance minio cluster on the meta node, too.
You can run sandbox on local VMs or cloud VMs. Pigsty offers a local sandbox based on Vagrant (pulling up local VMs using Virtualbox or libvirt), and a cloud sandbox based on Terraform (creating VMs using the cloud vendor API).
-
Local sandbox can be run on your Mac/PC for free. Your Mac/PC should have at least 4C/8G to run the full 4-node sandbox.
-
Cloud sandbox can be easily created and shared. You will have to create a cloud account for that. VMs are created on-demand and can be destroyed with one command, which is also very cheap for a quick glance.
Vagrant
Vagrant can create local VMs according to specs in a declarative way. Check Vagrant Templates Intro for details
Vagrant use VirtualBox as the default VM provider. however libvirt, docker, parallel desktop and vmware can also be used. We will use VirtualBox in this guide.
Installation
Make sure Vagrant and Virtualbox are installed and available on your OS.
If you are using macOS, You can use homebrew to install both of them with one command (reboot required). You can also use vagrant-libvirt on Linux.
/bin/bash -c "$(curl -fsSL https://raw.githubusercontent.com/Homebrew/install/HEAD/install.sh)"
brew install vagrant virtualbox ansible   # Run on MacOS with one command, but only works on x86_64 Intel chips
Configuration
Vagranfile is a ruby script file describing VM nodes. Here are some default specs of Pigsty.
| Templates | Nodes | Spec | Comment | Alias |
|---|---|---|---|---|
meta.rb |
1 node | 2c4g x 1 | Single Node Meta | Devbox |
dual.rb |
2 node | 1c2g x 2 | Dual Nodes | |
trio.rb |
3 node | 1c2G x 3 | Three Nodes | |
full.rb |
4 node | 2c4g + 1c2g x 3 | Full-Featured 4 Node | Sandbox |
prod.rb |
36 node | misc | Prod Env Simulation | Simubox |
build.r |
5 node | 1c2g x 4 | 4-Node Building Env | Buildbox |
rpm.rb |
3 node | 1c2G x 3 | 3-Node EL Building Env | |
deb.rb |
5 node | 1c2G x 5 | 5-Node Deb Building Env | |
all.rb |
7 node | 1c2G x 7 | 7-Node All Building Env |
Each spec file contains a Specs variable describe VM nodes. For example, the full.rb contains:
# full: pigsty full-featured 4-node sandbox for HA-testing & tutorial & practices

Specs = [
  { "name" => "meta"   , "ip" => "10.10.10.10" ,  "cpu" => "2" ,  "mem" => "4096" ,  "image" => "generic/rocky8"  },
  { "name" => "node-1" , "ip" => "10.10.10.11" ,  "cpu" => "1" ,  "mem" => "2048" ,  "image" => "generic/rocky8"  },
  { "name" => "node-2" , "ip" => "10.10.10.12" ,  "cpu" => "1" ,  "mem" => "2048" ,  "image" => "generic/rocky8"  },
  { "name" => "node-3" , "ip" => "10.10.10.13" ,  "cpu" => "1" ,  "mem" => "2048" ,  "image" => "generic/rocky8"  },
]
You can use specs with the config script, it will render the final Vagrantfile according to the spec and other options
cd ~/pigsty
vagrant/config [spec] [image] [scale] [provider]

vagrant/config meta                # use the 1-node spec, default el8 image
vagrant/config dual el9            # use the 2-node spec, use el9 image instead
vagrant/config trio d12 2          # use the 3-node spec, use debian12 image, double the cpu/mem resource
vagrant/config full u22 4          # use the 4-node spec, use ubuntu22 image instead, use 4x cpu/mem resource
vagrant/config prod u20 1 libvirt  # use the 43-node spec, use ubuntu20 image instead, use libvirt as provider instead of virtualbox
You can scale the resource unit with environment variable VM_SCALE, the default value is 1.
For example, if you use VM_SCALE=2 with vagrant/config meta, it will double the cpu / mem resources of the meta node.
# pigsty singleton-meta environment (4C8G)

Specs = [
  { "name" => "meta"          , "ip" => "10.10.10.10"   , "cpu" => "8"    , "mem" => "16384"    , "image" => "generic/rocky8"   },
]
Shortcuts
Create pre-configured environment with make shortcuts:
make meta       # 1-node devbox for quick start, dev, test & playground
make full       # 4-node sandbox for HA-testing & feature demonstration
make prod       # 43-node simubox for production environment simulation

# seldom used templates:
make dual       # 2-node env
make trio       # 3-node env
You can use variant alias to create environment with different base image:
make meta9      # create singleton-meta node with generic/rocky9 image
make full22     # create 4-node sandbox with generic/ubuntu22 image
make prod12     # create 43-node production env simubox with generic/debian12 image
...             # available suffix: 7,8,9,11,12,20,22,24
You can also launch pigsty building env with these alias, base image will not be substituted:
make build      # 4-node building environment
make rpm        # 3-node el7/8/9 building env
make deb        # 5-node debian11/12 ubuntu20/22/24
make all        # 7-node building env with all base images
Management
After describing the VM nodes with specs and generate the vagrant/Vagrantfile. you can create the VMs with vagrant up command.
Pigsty templates will use your ~/.ssh/id_rsa[.pub] as the default ssh key for vagrant provisioning.
Make sure you have a valid ssh key pair before you start, you can generate one by: ssh-keygen -t rsa -b 2048
There are some makefile shortcuts that wrap the vagrant commands, you can use them to manage the VMs.
make         # = make start
make new     # destroy existing vm and create new ones
make ssh     # write VM ssh config to ~/.ssh/     (required)
make dns     # write VM DNS records to /etc/hosts (optional)
make start   # launch VMs and write ssh config    (up + ssh)
make up      # launch VMs with vagrant up
make halt    # shutdown VMs (down,dw)
make clean   # destroy VMs (clean/del/destroy)
make status  # show VM status (st)
make pause   # pause VMs (suspend,pause)
make resume  # pause VMs (resume)
make nuke    # destroy all vm & volumes with virsh (if using libvirt)
Caveat
If you are using virtualbox, you have to add 10.0.0.0/8 to /etc/vbox/networks.conf first to use 10.x.x.x in host-only networks.
# /etc/vbox/networks.conf
* 10.0.0.0/8
Reference: https://discuss.hashicorp.com/t/vagran-can-not-assign-ip-address-to-virtualbox-machine/30930/3
Terraform
Terraform is an open-source tool to practice ‘Infra as Code’. Describe the cloud resource you want and create them with one command.
Pigsty has Terraform templates for AWS, Aliyun, and Tencent Cloud, you can use them to create VMs on the cloud for Pigsty Demo.
Terraform can be easily installed with homebrew, too: brew install terraform. You will have to create a cloud account to obtain AccessKey and AccessSecret credentials to proceed.
Quick Start
brew install terraform    # install via homebrew
terraform init            # install terraform provider: aliyun , aws, only required for the first time
terraform apply           # plan and apply: create VMs, etc...
Print public IP Address:
terraform output | grep -Eo '[0-9]{1,3}\.[0-9]{1,3}\.[0-9]{1,3}\.[0-9]{1,3}'
Specifications
- spec/aliyun-meta.tf : Aliyun 1 meta node template for all distro & amd/arm (default)
- spec/aliyun-full.tf : Aliyun 4-node sandbox template for all distro & amd/arm.
- spec/aliyun-oss.tf : Aliyun 5-node building template for all distro & amd/arm.
- spec/aws-cn.tf : AWS 4 node CentOS7 environment
- spec/tencentcloud.tf : QCloud 4 node CentOS7 environment
Aliyun Credential
You can add your aliyun credentials to the environment file, such as ~/.bash_profile
export ALICLOUD_ACCESS_KEY="<your_access_key>"
export ALICLOUD_SECRET_KEY="<your_secret_key>"
export ALICLOUD_REGION="cn-beijing"
AWS Credential
You have to set up aws config & credential to use AWS provider.
# ~/.aws

# ~/.aws/config
[default]
region = cn-northwest-1

# ~/.aws/credentials
[default]
aws_access_key_id = <YOUR_AWS_ACCESS_KEY>
aws_secret_access_key =  <AWS_ACCESS_SECRET>

# ~/.aws/pigsty-key
# ~/.aws/pigsty-key.pub
8 - Security
Pigsty already provides a secure-by-default authentication and access control model, which is sufficient for most scenarios.
But if you want to further strengthen the security of the system, the following suggestions are for your reference:
Confidentiality
Important Files
Secure your pigsty config inventory
pigsty.ymlhas highly sensitive information, including passwords, certificates, and keys.- You should limit access to admin/infra nodes, only accessible by the admin/dba users
- Limit access to the git repo, if you are using git to manage your pigsty source.
Secure your CA private key and other certs
- These files are very important, and will be generated under
files/pkiunder pigsty source dir by default. - You should secure & backup them in a safe place periodically.
Passwords
Always change these passwords, DO NOT USE THE DEFAULT VALUES:
grafana_admin_password:pigstypg_admin_password:DBUser.DBApg_monitor_password:DBUser.Monitorpg_replication_password:DBUser.Replicatorpatroni_password:Patroni.APIhaproxy_admin_password:pigstyminio_secret_key:minioadmin
Please change MinIO user secret key and pgbackrest_repo references
- Please change the password for
minio_users.[pgbacrest].secret_key - Please change pgbackrest references:
pgbackrest_repo.minio.s3_key_secret
If you are using remote backup method, secure backup with distinct passwords
- Use
aes-256-cbcforpgbackrest_repo.*.cipher_type - When setting a password, you can use
${pg_cluster}placeholder as part of the password to avoid using the same password.
Use advanced password encryption method for PostgreSQL
- use
pg_pwd_encdefaultscram-sha-256instead of legacymd5
Enforce a strong pg password with the passwordcheck extension.
- add
$lib/passwordchecktopg_libsto enforce password policy.
Encrypt remote backup with an encryption algorithm
- check
pgbackrest_repodefinitionrepo_cipher_type
Add an expiration date to biz user passwords.
-
You can set an expiry date for each user for compliance purposes.
-
Don’t forget to refresh these passwords periodically.
- { name: dbuser_meta , password: Pleas3-ChangeThisPwd ,expire_in: 7300 ,pgbouncer: true ,roles: [ dbrole_admin ]    ,comment: pigsty admin user }
- { name: dbuser_view , password: Make.3ure-Compl1ance  ,expire_in: 7300 ,pgbouncer: true ,roles: [ dbrole_readonly ] ,comment: read-only viewer for meta database }
- { name: postgres     ,superuser: true  ,expire_in: 7300                        ,comment: system superuser }
- { name: replicator ,replication: true  ,expire_in: 7300 ,roles: [pg_monitor, dbrole_readonly]   ,comment: system replicator }
- { name: dbuser_dba   ,superuser: true  ,expire_in: 7300 ,roles: [dbrole_admin]  ,pgbouncer: true ,pool_mode: session, pool_connlimit: 16 , comment: pgsql admin user }
- { name: dbuser_monitor ,roles: [pg_monitor] ,expire_in: 7300 ,pgbouncer: true ,parameters: {log_min_duration_statement: 1000 } ,pool_mode: session ,pool_connlimit: 8 ,comment: pgsql monitor user }
Do not log changing password statement into postgres log.
SET log_statement TO 'none';
ALTER USER "{{ user.name }}" PASSWORD '{{ user.password }}';
SET log_statement TO DEFAULT;
IP Addresses
Bind to specific IP addresses rather than all addresses for postgres/pgbouncer/patroni
- The default
pg_listenaddress is0.0.0.0, which is all IPv4 addresses. - consider using
pg_listen: '${ip},${vip},${lo}'to bind to specific addresses for better security.
Do not expose any port to the Internet; except 80/443, the infra portal
- Grafana/Prometheus are bind to all IP address by default for convenience.
- You can modify their bind configuration to listen on localhost/intranet IP and expose by Nginx.
- Redis server are bind to all IP address by default for convenience. You can change
redis_bind_addressto listen on intranet IP. - You can also implement it with the security group or firewall rules.
Limit postgres client access with HBA
- There’s a security enhance config template:
security.yml
Limit patroni admin access from the infra/admin node.
- This is restricted by default with
restapi.allowlist
Network Traffic
-
Access Nginx with SSL and domain names
- Nginx SSL is controlled by
nginx_sslmode, which isenableby default. - Nginx Domain names are specified by
infra_portal.<value>.domain.
- Nginx SSL is controlled by
-
Secure Patroni REST API with SSL
patroni_ssl_enabledis disabled by default- Since it affects health checks and API invocation.
- Note this is a global option, and you have to decide before deployment.
-
Secure Pgbouncer Client Traffic with SSL
pgbouncer_sslmodeisdisableby default- Since it has a significant performance impact.
Integrity
Consistency
Use consistency-first mode for PostgreSQL.
- Use
crit.ymltemplates forpg_confwill trade some availability for the best consistency.
Use node crit tuned template for better consistency
- set
node_tunetocritto reduce dirty page ratio.
- Enable data checksum to detect silent data corruption.
pg_checksumis disabled by default, and enabled forcrit.ymlby default- This can be enabled later, which requires a full cluster scan/stop.
Audit
- Enable
log_connectionsandlog_disconnectionsafter the pg cluster bootstrap.- Audit incoming sessions; this is enabled in
crit.ymlby default.
- Audit incoming sessions; this is enabled in
Availability
-
Do not access the database directly via a fixed IP address; use VIP, DNS, HAProxy, or their combination.
- Haproxy will handle the traffic control for the clients in case of failover/switchover.
-
Use enough nodes for serious production deployment.
- You need at least three nodes (tolerate one node failure) to achieve production-grade high availability.
- If you only have two nodes, you can tolerate the failure of the specific standby node.
- If you have one node, use an external S3/MinIO for cold backup & wal archive storage.
-
Trade off between availability and consistency for PostgreSQL.
-
Use multiple infra nodes in serious production deployment (e.g., 1~3)
- Usually, 2 ~ 3 is enough for a large production deployment.
-
Use enough etcd members and use even numbers (1,3,5,7).
- Check ETCD Configuration for details.
9 - FAQ
If you have any unlisted questions or suggestions, please create an Issue or ask the community for help.
How to Get the Pigsty Source Package?
Use the following command to install Pigsty with one click: curl -fsSL https://repo.pigsty.io/get | bash
This command will automatically download the latest stable version pigsty.tgz and extract it to the ~/pigsty directory. You can also manually download a specific version of the Pigsty source code from the following locations.
If you need to install it in an environment without internet access, you can download it in advance in a networked environment and transfer it to the production server via scp/sftp or CDROM/USB.
How to Speed Up RPM Downloads from Upstream Repositories?
Consider using a local repository mirror, which can be configured with the repo_upstream parameter. You can choose region to use different mirror sites.
For example, you can set region = china, which will use the URL with the key china in the baseurl instead of default.
If some repositories are blocked by a firewall or the GFW, consider using proxy_env to bypass it.
How to resolve node package conflict?
Beware that Pigsty’s pre-built offline packages are tailored for specific minor versions OS Distors.
Therefore, if the major.minor version of your OS distro does not precisely align, we advise against using the offline installation packages.
Instead, following the default installation procedure and download the package directly from upstream repo through the Internet, which will acquire the versions that exactly match your OS version.
If online installation doesn’t work for you, you can first try modifying the upstream software sources used by Pigsty.
For example, in EL family operating systems, Pigsty’s default upstream sources use a major version placeholder $releasever, which resolves to specific major versions like 7, 8, 9.
However, many operating system distributions offer a Vault, allowing you to use a package mirror for a specific version.
Therefore, you could replace the front part of the repo_upstream parameter’s BaseURL with a specific Vault minor version repository, such as:
https://dl.rockylinux.org/pub/rocky/$releasever(Original BaseURL prefix, withoutvault)https://vault.centos.org/7.6.1810/(Using 7.6 instead of the default 7.9)https://dl.rockylinux.org/vault/rocky/8.6/(Using 8.6 instead of the default 8.10)https://dl.rockylinux.org/vault/rocky/9.2/(Using 9.2 instead of the default 9.5)
Make sure the vault URL path exists & valid before replacing the old values. Beware that some repo like epel do not offer specific minor version subdirs.
Upstream repo that support this approach include: base, updates, extras, centos-sclo, centos-sclo-rh, baseos, appstream, extras, crb, powertools, pgdg-common, pgdg1*
repo_upstream:
  - { name: pigsty-local   ,description: 'Pigsty Local'      ,module: local ,releases: [7,8,9] ,baseurl: { default: 'http://${admin_ip}/pigsty'  }} # used by intranet nodes
  - { name: pigsty-infra   ,description: 'Pigsty INFRA'      ,module: infra ,releases: [7,8,9] ,baseurl: { default: 'https://repo.pigsty.io/rpm/infra/$basearch' ,china: 'https://repo.pigsty.cc/rpm/infra/$basearch' }}
  - { name: pigsty-pgsql   ,description: 'Pigsty PGSQL'      ,module: pgsql ,releases: [7,8,9] ,baseurl: { default: 'https://repo.pigsty.io/rpm/pgsql/el$releasever.$basearch' ,china: 'https://repo.pigsty.cc/rpm/pgsql/el$releasever.$basearch' }}
  - { name: nginx          ,description: 'Nginx Repo'        ,module: infra ,releases: [7,8,9] ,baseurl: { default: 'https://nginx.org/packages/centos/$releasever/$basearch/' }}
  - { name: docker-ce      ,description: 'Docker CE'         ,module: infra ,releases: [7,8,9] ,baseurl: { default: 'https://download.docker.com/linux/centos/$releasever/$basearch/stable'        ,china: 'https://mirrors.aliyun.com/docker-ce/linux/centos/$releasever/$basearch/stable'  ,europe: 'https://mirrors.xtom.de/docker-ce/linux/centos/$releasever/$basearch/stable' }}
  - { name: base           ,description: 'EL 7 Base'         ,module: node  ,releases: [7    ] ,baseurl: { default: 'http://mirror.centos.org/centos/$releasever/os/$basearch/'                    ,china: 'https://mirrors.tuna.tsinghua.edu.cn/centos/$releasever/os/$basearch/'           ,europe: 'https://mirrors.xtom.de/centos/$releasever/os/$basearch/'           }}
  - { name: updates        ,description: 'EL 7 Updates'      ,module: node  ,releases: [7    ] ,baseurl: { default: 'http://mirror.centos.org/centos/$releasever/updates/$basearch/'               ,china: 'https://mirrors.tuna.tsinghua.edu.cn/centos/$releasever/updates/$basearch/'      ,europe: 'https://mirrors.xtom.de/centos/$releasever/updates/$basearch/'      }}
  - { name: extras         ,description: 'EL 7 Extras'       ,module: node  ,releases: [7    ] ,baseurl: { default: 'http://mirror.centos.org/centos/$releasever/extras/$basearch/'                ,china: 'https://mirrors.tuna.tsinghua.edu.cn/centos/$releasever/extras/$basearch/'       ,europe: 'https://mirrors.xtom.de/centos/$releasever/extras/$basearch/'       }}
  - { name: epel           ,description: 'EL 7 EPEL'         ,module: node  ,releases: [7    ] ,baseurl: { default: 'http://download.fedoraproject.org/pub/epel/$releasever/$basearch/'            ,china: 'https://mirrors.tuna.tsinghua.edu.cn/epel/$releasever/$basearch/'                ,europe: 'https://mirrors.xtom.de/epel/$releasever/$basearch/'                }}
  - { name: centos-sclo    ,description: 'EL 7 SCLo'         ,module: node  ,releases: [7    ] ,baseurl: { default: 'http://mirror.centos.org/centos/$releasever/sclo/$basearch/sclo/'             ,china: 'https://mirrors.aliyun.com/centos/$releasever/sclo/$basearch/sclo/'              ,europe: 'https://mirrors.xtom.de/centos/$releasever/sclo/$basearch/sclo/'    }}
  - { name: centos-sclo-rh ,description: 'EL 7 SCLo rh'      ,module: node  ,releases: [7    ] ,baseurl: { default: 'http://mirror.centos.org/centos/$releasever/sclo/$basearch/rh/'               ,china: 'https://mirrors.aliyun.com/centos/$releasever/sclo/$basearch/rh/'                ,europe: 'https://mirrors.xtom.de/centos/$releasever/sclo/$basearch/rh/'      }}
  - { name: baseos         ,description: 'EL 8+ BaseOS'      ,module: node  ,releases: [  8,9] ,baseurl: { default: 'https://dl.rockylinux.org/pub/rocky/$releasever/BaseOS/$basearch/os/'         ,china: 'https://mirrors.aliyun.com/rockylinux/$releasever/BaseOS/$basearch/os/'          ,europe: 'https://mirrors.xtom.de/rocky/$releasever/BaseOS/$basearch/os/'     }}
  - { name: appstream      ,description: 'EL 8+ AppStream'   ,module: node  ,releases: [  8,9] ,baseurl: { default: 'https://dl.rockylinux.org/pub/rocky/$releasever/AppStream/$basearch/os/'      ,china: 'https://mirrors.aliyun.com/rockylinux/$releasever/AppStream/$basearch/os/'       ,europe: 'https://mirrors.xtom.de/rocky/$releasever/AppStream/$basearch/os/'  }}
  - { name: extras         ,description: 'EL 8+ Extras'      ,module: node  ,releases: [  8,9] ,baseurl: { default: 'https://dl.rockylinux.org/pub/rocky/$releasever/extras/$basearch/os/'         ,china: 'https://mirrors.aliyun.com/rockylinux/$releasever/extras/$basearch/os/'          ,europe: 'https://mirrors.xtom.de/rocky/$releasever/extras/$basearch/os/'     }}
  - { name: crb            ,description: 'EL 9 CRB'          ,module: node  ,releases: [    9] ,baseurl: { default: 'https://dl.rockylinux.org/pub/rocky/$releasever/CRB/$basearch/os/'            ,china: 'https://mirrors.aliyun.com/rockylinux/$releasever/CRB/$basearch/os/'             ,europe: 'https://mirrors.xtom.de/rocky/$releasever/CRB/$basearch/os/'        }}
  - { name: powertools     ,description: 'EL 8 PowerTools'   ,module: node  ,releases: [  8  ] ,baseurl: { default: 'https://dl.rockylinux.org/pub/rocky/$releasever/PowerTools/$basearch/os/'     ,china: 'https://mirrors.aliyun.com/rockylinux/$releasever/PowerTools/$basearch/os/'      ,europe: 'https://mirrors.xtom.de/rocky/$releasever/PowerTools/$basearch/os/' }}
  - { name: epel           ,description: 'EL 8+ EPEL'        ,module: node  ,releases: [  8,9] ,baseurl: { default: 'http://download.fedoraproject.org/pub/epel/$releasever/Everything/$basearch/' ,china: 'https://mirrors.tuna.tsinghua.edu.cn/epel/$releasever/Everything/$basearch/'     ,europe: 'https://mirrors.xtom.de/epel/$releasever/Everything/$basearch/'     }}
  - { name: pgdg-common    ,description: 'PostgreSQL Common' ,module: pgsql ,releases: [7,8,9] ,baseurl: { default: 'https://download.postgresql.org/pub/repos/yum/common/redhat/rhel-$releasever-$basearch' ,china: 'https://mirrors.tuna.tsinghua.edu.cn/postgresql/repos/yum/common/redhat/rhel-$releasever-$basearch' , europe: 'https://mirrors.xtom.de/postgresql/repos/yum/common/redhat/rhel-$releasever-$basearch' }}
  - { name: pgdg-extras    ,description: 'PostgreSQL Extra'  ,module: pgsql ,releases: [7,8,9] ,baseurl: { default: 'https://download.postgresql.org/pub/repos/yum/common/pgdg-rhel$releasever-extras/redhat/rhel-$releasever-$basearch' ,china: 'https://mirrors.tuna.tsinghua.edu.cn/postgresql/repos/yum/common/pgdg-rhel$releasever-extras/redhat/rhel-$releasever-$basearch' , europe: 'https://mirrors.xtom.de/postgresql/repos/yum/common/pgdg-rhel$releasever-extras/redhat/rhel-$releasever-$basearch' }}
  - { name: pgdg-el8fix    ,description: 'PostgreSQL EL8FIX' ,module: pgsql ,releases: [  8  ] ,baseurl: { default: 'https://download.postgresql.org/pub/repos/yum/common/pgdg-centos8-sysupdates/redhat/rhel-8-x86_64/' ,china: 'https://mirrors.tuna.tsinghua.edu.cn/postgresql/repos/yum/common/pgdg-centos8-sysupdates/redhat/rhel-8-x86_64/' , europe: 'https://mirrors.xtom.de/postgresql/repos/yum/common/pgdg-centos8-sysupdates/redhat/rhel-8-x86_64/' } }
  - { name: pgdg-el9fix    ,description: 'PostgreSQL EL9FIX' ,module: pgsql ,releases: [    9] ,baseurl: { default: 'https://download.postgresql.org/pub/repos/yum/common/pgdg-rocky9-sysupdates/redhat/rhel-9-x86_64/'  ,china: 'https://mirrors.tuna.tsinghua.edu.cn/postgresql/repos/yum/common/pgdg-rocky9-sysupdates/redhat/rhel-9-x86_64/' , europe: 'https://mirrors.xtom.de/postgresql/repos/yum/common/pgdg-rocky9-sysupdates/redhat/rhel-9-x86_64/' }}
  - { name: pgdg15         ,description: 'PostgreSQL 15'     ,module: pgsql ,releases: [7    ] ,baseurl: { default: 'https://download.postgresql.org/pub/repos/yum/15/redhat/rhel-$releasever-$basearch' ,china: 'https://mirrors.tuna.tsinghua.edu.cn/postgresql/repos/yum/15/redhat/rhel-$releasever-$basearch' ,europe: 'https://mirrors.xtom.de/postgresql/repos/yum/15/redhat/rhel-$releasever-$basearch' }}
  - { name: pgdg16         ,description: 'PostgreSQL 16'     ,module: pgsql ,releases: [  8,9] ,baseurl: { default: 'https://download.postgresql.org/pub/repos/yum/16/redhat/rhel-$releasever-$basearch' ,china: 'https://mirrors.tuna.tsinghua.edu.cn/postgresql/repos/yum/16/redhat/rhel-$releasever-$basearch' ,europe: 'https://mirrors.xtom.de/postgresql/repos/yum/16/redhat/rhel-$releasever-$basearch' }}
  - { name: timescaledb    ,description: 'TimescaleDB'       ,module: pgsql ,releases: [7,8,9] ,baseurl: { default: 'https://packagecloud.io/timescale/timescaledb/el/$releasever/$basearch'  }}
After explicitly defining and overriding the repo_upstream in the Pigsty configuration file, (you may clear the /www/pigsty/repo_complete flag) try the installation again.
If the upstream software source and the mirror source software do not solve the problem, you might consider replacing them with the operating system’s built-in software sources and attempt a direct installation from upstream once more.
Finally, if the above methods do not resolve the issue, consider removing conflicting packages from node_packages, infra_packages, pg_packages, pg_extensions, or remove or upgrade the conflicting packages on the existing system.
What does bootstrap do?
Check the environment, ask for downloading offline packages, and make sure the essential tool
ansibleis installed.
It will make sure the essential tool ansible is installed by various means.
When you download the Pigsty source code, you can enter the directory and execute the bootstrap script.
It will check if your node environment is ready, and if it does not find offline packages, it will ask if you want to download them from the internet if applicable.
You can choose y to use offline packages, which will make the installation procedure faster.
You can also choose n to skip and download directly from the internet during the installation process,
which will download the latest software versions and reduce the chance of RPM conflicts.
What does configure do?
Detect the environment, generate the configuration, enable the offline package (optional), and install the essential tool Ansible.
After downloading the Pigsty source package and unpacking it, you may have to execute ./configure to complete the environment configuration. This is optional if you already know how to configure Pigsty properly.
The configure procedure will detect your node environment and generate a pigsty config file: pigsty.yml for you.
What is the Pigsty config file?
pigsty.ymlunder the pigsty home dir is the default config file.
Pigsty uses a single config file pigsty.yml, to describe the entire environment, and you can define everything there. There are many config examples in files/pigsty for your reference.
You can pass the -i <path> to playbooks to use other configuration files. For example, you want to install redis according to another config: redis.yml:
./redis.yml -i conf/demo/redis.yml
How to use the CMDB as config inventory
The default config file path is specified in ansible.cfg: inventory = pigsty.yml
You can switch to a dynamic CMDB inventory with bin/inventory_cmdb, and switch back to the local config file with bin/inventory_conf. You must also load the current config file inventory to CMDB with bin/inventory_load.
If CMDB is used, you must edit the inventory config from the database rather than the config file.
What is the IP address placeholder in the config file?
Pigsty uses
10.10.10.10as a placeholder for the current node IP, which will be replaced with the primary IP of the current node during the configuration.
When the configure detects multiple NICs with multiple IPs on the current node, the config wizard will prompt for the primary IP to be used, i.e., the IP used by the user to access the node from the internal network. Note that please do not use the public IP.
This IP will be used to replace 10.10.10.10 in the config file template.
Which parameters need your attention?
Usually, in a singleton installation, there is no need to make any adjustments to the config files.
Pigsty provides 265 config parameters to customize the entire infra/node/etcd/minio/pgsql. However, there are a few parameters that can be adjusted in advance if needed:
- When accessing web service components, the domain name is
infra_portal(some services can only be accessed using the domain name through the Nginx proxy). - Pigsty assumes that a
/datadir exists to hold all data; you can adjust these paths if the data disk mount point differs from this. - Don’t forget to change those passwords in the config file for your production deployment.
Installation
What was executed during installation?
When running
make install, the ansible-playbookinstall.ymlwill be invoked to install everything on all nodes
Which will:
- Install
INFRAmodule on the current node. - Install
NODEmodule on the current node. - Install
ETCDmodule on the current node. - The
MinIOmodule is optional, and will not be installed by default. - Install
PGSQLmodule on the current node.
How to resolve RPM conflict?
There may have a slight chance that rpm conflict occurs during node/infra/pgsql packages installation.
The simplest way to resolve this is to install without offline packages, which will download directly from the upstream repo.
If there are only a few problematic RPM/DEB pakages, you can use a trick to fix the yum/apt repo quickly:
rm -rf /www/pigsty/repo_complete    # delete the repo_complete flag file to mark this repo incomplete
rm -rf SomeBrokenPackages           # delete problematic RPM/DEB packages
./infra.yml -t repo_upstream        # write upstream repos. you can also use /etc/yum.repos.d/backup/*
./infra.yml -t repo_pkg             # download rpms according to your current OS
How to create local VMs with vagrant
The first time you use Vagrant to pull up a particular OS repo, it will download the corresponding BOX.
Pigsty sandbox uses generic/rocky9 image box by default, and Vagrant will download the rocky/9 box for the first time the VM is started.
Using a proxy may increase the download speed. Box only needs to be downloaded once, and will be reused when recreating the sandbox.
RPMs error on Aliyun CentOS 7.9
Aliyun CentOS 7.9 server has DNS caching service
nscdinstalled by default. Just remove it.
Aliyun’s CentOS 7.9 repo has nscd installed by default, locking out the glibc version, which can cause RPM dependency errors during installation.
"Error: Package: nscd-2.17-307.el7.1.x86_64 (@base)"
Run yum remove -y nscd on all nodes to resolve this issue, and with Ansible, you can batch.
ansible all -b -a 'yum remove -y nscd'
RPMs error on Tencent Qcloud Rocky 9.1
Tencent Qcloud Rocky 9.1 require extra
annobinpackages
./infra.yml -t repo_upstream      # add upstream repos
cd /www/pigsty;                   # download missing packages
repotrack annobin gcc-plugin-annobin libuser
./infra.yml -t repo_create        # create repo
Ansible command timeout (Timeout waiting for xxx)
The default ssh timeout for ansible command is 10 seconds, some commands may take longer than that due to network latency or other reasons.
You can increase the timeout parameter in the ansible config file ansible.cfg:
[defaults]
timeout = 10 # change to 60,120 or more